Have you ever gazed longingly at beautifully adorned lattes, wishing you could bring that same artistic flair to your morning cup? The secret often lies in stencils, and the good news is you don’t need a barista’s degree or expensive equipment to create stunning designs. Diving into the world of DIY latte art stencils opens up a realm of personalization, allowing you to transform your everyday coffee into a canvas for your unique creativity. This comprehensive guide will walk you through everything you need to know, from selecting the right materials and tools to crafting and using your very own custom stencils, ensuring every sip is a work of art.
What Are DIY Latte Art Stencils and Why Make Your Own?
DIY latte art stencils are simply custom-made templates used to sprinkle decorative powders like cocoa, cinnamon, or matcha onto the frothed milk of a hot beverage, creating a specific design. They serve as a bridge between your creative vision and the foam in your cup, allowing for intricate patterns and personalized messages without requiring advanced free-pouring latte art skills.
The appeal of making your own extends far beyond just saving a few dollars. Customization is the biggest draw. Imagine greeting your partner with a coffee bearing their initial, celebrating a holiday with festive designs, or simply enjoying a unique pattern that speaks to your personality. Store-bought stencils, while convenient, often come with generic designs. Crafting your own allows for unlimited creativity, from intricate monograms to playful cartoon characters or even seasonal motifs. It’s a budget-friendly way to elevate your home barista game, offering a rewarding creative outlet that culminates in a delicious, personalized drink.
 A collection of personalized latte art designs created with custom stencils, showcasing diverse patterns.
Exploring Materials for Your Homemade Latte Art Stencils
The material you choose for your DIY latte art stencils significantly impacts their durability, ease of cutting, and reusability. Each option offers a unique balance of accessibility and longevity, catering to different skill levels and intended uses.
Paper or Cardstock Stencils
|
Our Picks for the Best Milk steamer in 2026
As an Amazon Associate I earn from qualifying purchases.
|
||
| Num | Product | Action |
|---|---|---|
| 1 | Large Electric Milk Frother and Steamer, 16.9oz/500ml Milk Steamer and Frother for Latte or Hot Chocolate, Dishwasher Safe, 6 Functions, Enjoy Perfect Milk Froth in 2 Min (White-Glass) |

|
| 2 | SIMPLETASTE Milk Frother, 4-in-1 Electric Milk Steamer, Automatic Warm and Cold Foam Maker and Milk Warmer for Latte, Cappuccinos, Macchiato |
|
| 3 | Electric Milk Frother and Steamer, 16.9oz/500ml Milk Steamer and Frother for Latte, Dishwasher Safe, BPA Free, 4 Functions, Enjoy Perfect Milk Froth in 2 Min |
|
| 4 | HAUSHOF Milk Frother, 4-in-1 Electric Milk Frother and Steamer, Large Capacity, Hot Chocolate Maker, Automatic Warm and Cold Foam Maker for Coffee, Latte, Macchiato, Cappuccino |
|
| 5 | Milk Frother and Steamer, Large Capacity & Detachable Electric Milk Frother, Automatic Warm and Cold Foam Maker, Hot Chocolate Maker, Stainless Steel Jug, 30.44Oz./900ML |
|
| 6 | Milk Frother, 4-in-1 Electric Milk Steamer, 350ml/11.8oz Automatic Frother Machine for Coffee, Warm and Cold Foam, Temperature Control for Latte, Cappuccino, Hot Chocolate |
|
| 7 | SIMPLETASTE Milk Frother, 4-in-1 Electric Milk Steamer, Automatic Warm and Cold Foam Maker and Milk Warmer for Latte, Cappuccinos, Macchiato |
|
| 8 | Milk Frother, Paris Rhône 4-in-1 Milk Steamer and Frother, Hot & Cold Foam Milk Warmer with Temperature Control, Auto Shut-Off Frothers for Coffee, Latte, Cappuccino, Macchiato |
|
| 9 | Milk Frother, 4-in-1 Milk Frother and Steamer, 10.6oz Electric Milk Steamer, Automatic Cold and Hot Foam maker for Lattes, Cappuccinos, Ceramic Lining Interior (Polished) |
|
| 10 | SIMPLETASTE Milk Frother, 4-in-1 Electric Milk Frother and Steamer, Automatic Warm and Cold Foam Maker and Milk Warmer for Latte, Cappuccinos, Dark Blue |
|
Paper and cardstock are the most accessible materials for beginners. They are readily available, inexpensive, and incredibly easy to cut with basic tools. This makes them ideal for experimenting with various designs or creating single-use, disposable stencils for parties or special occasions. However, their main drawback is a lack of durability; they absorb moisture from the steam and powder, becoming soggy and losing their shape quickly, meaning they are not washable or reusable.
Plastic Sheet Stencils
Thin plastic sheets, such as those found in binder dividers, clear acetate sheets, or even repurposed plastic packaging (ensure it’s food-safe), offer a significant step up in durability and reusability. These materials are stiffer than paper but still pliable enough to cut with a sharp craft knife or scissors. Plastic stencils can be gently washed and reused multiple times, making them a more sustainable choice for those who enjoy regular latte art. They strike a good balance between ease of creation and practical longevity.
Acrylic Stencils
For the ultimate in durability and a professional finish, acrylic sheets are the material of choice. While requiring more specialized tools and a higher initial investment, acrylic stencils are robust, completely washable, and can last for years. They are perfect for advanced DIYers or those looking to create a permanent collection of their favorite designs. Cutting acrylic typically requires a strong craft knife with multiple passes, a specialized cutting machine like a Cricut with a knife blade, or even a laser cutter for truly intricate designs. The smooth, non-porous surface ensures clean edges and easy cleaning.
Essential Tools for Crafting Your Own Stencils
Having the right tools is crucial for achieving clean cuts and well-defined designs, regardless of your chosen material.
- Cutting Tools:
- X-Acto Knife or Craft Knife: Essential for precision cutting, especially for intricate designs. A sharp blade is key for clean edges.
- Scissors: Suitable for simpler, larger shapes, particularly when working with paper or thin plastic.
- Cutting Mat: Protects your work surface and provides a stable base for precise cuts with an X-Acto or craft knife. A thick piece of cardboard can serve as an alternative.
- Cutting Machine (e.g., Cricut, Silhouette): For those with crafting machines, these devices can cut complex designs with high accuracy from various materials, including thicker cardstock, plastic, and even thin acrylic (with the appropriate blade).
- Design Tools:
- Pencil and Eraser: For sketching your ideas directly onto the material or a template.
- Ruler and Compass: Helpful for creating straight lines and perfect circles, ensuring your stencil fits neatly over your cup.
- Printer: If you’re using digital designs or printable templates, a printer is indispensable for transferring your pattern to your chosen material.
- Graphic Design Software (Optional): Programs like Adobe Illustrator or free alternatives like Inkscape allow you to create precise digital designs, ensuring perfect symmetry and scale before printing.
Step-by-Step Guide: How to Create Your DIY Latte Art Stencils
Crafting your own latte art stencils is a rewarding process that combines creativity with a bit of precision. Follow these steps to bring your unique designs to life.
1. Design Your Stencil
This is where your imagination takes flight. Begin by brainstorming ideas. Do you want a simple heart, a custom initial, a holiday symbol, or something entirely unique?
- Sketching: Start by sketching your design on paper. Keep in mind that simpler shapes with thicker connecting lines tend to work best, as very fine details can be fragile and difficult to cut, or may blur when dusted. The design will be the open area where powder passes through, so ensure the parts you want to appear on the latte are connected to the main stencil frame.
- Sizing: A good general guideline for the outer diameter of a stencil is 3.5 to 4 inches, with the design itself fitting within a 2- to 3-inch radius in the center to accommodate most standard coffee mugs. You can draw a circle the size of your cup’s rim to use as a guide.
- Digital Design (Optional): If you’re comfortable with graphic design software, create your design digitally. This allows for precise scaling, symmetry, and the addition of a small tab or handle for easier handling. Print your design at 1:1 scale on paper first to test the size and look before committing to your stencil material.
2. Choose and Prepare Your Material
Based on your needs for durability and reusability, select your material (paper/cardstock, plastic, or acrylic).
- Paper/Cardstock: Simply cut a square or circle larger than your desired stencil size.
- Plastic Sheets: If using a sheet, cut it to a manageable size. For repurposed plastic, ensure it’s clean and flat.
- Acrylic: Carefully measure and score your acrylic sheet to the desired size using a craft knife and ruler, then snap it cleanly, or use a cutting machine.
- Once your material is ready, secure it firmly to a cutting mat or a thick cardboard base using painter’s tape to prevent it from shifting during cutting. If using a printed template, tape the template directly onto your stencil material.
3. Cut Your Design
This step requires patience and a steady hand.
- Using an X-Acto/Craft Knife: Carefully trace along the lines of your design, applying even pressure. For intricate details, make several light passes rather than trying to cut through in one go. Rotate your material, not your hand, to maintain control. Always cut away from yourself.
- Using Scissors: For simpler paper or thin plastic designs, carefully cut along the lines. This is less precise than a knife but effective for basic shapes.
- Using a Cutting Machine: Upload your digital design (usually an SVG file) to your machine’s software. Select the appropriate material settings and blade type (e.g., a knife blade for thicker materials like chipboard or thin acrylic). Follow the machine’s instructions for loading and cutting your material. This method offers unparalleled precision and intricate detail capabilities.
4. Refine and Finish Your Stencil
Once your cutting is complete, carefully remove your stencil from the cutting mat.
- Smooth Edges: Gently clean up any rough edges with your craft knife or fine-grit sandpaper (for plastic/acrylic).
- Remove Excess Material: Ensure all the cut-out pieces are fully detached, leaving a clean, open design.
- Add a Handle (Optional): If your design doesn’t already incorporate a handle, you can cut a small tab on the side of the stencil to make it easier to hold without disturbing the design.
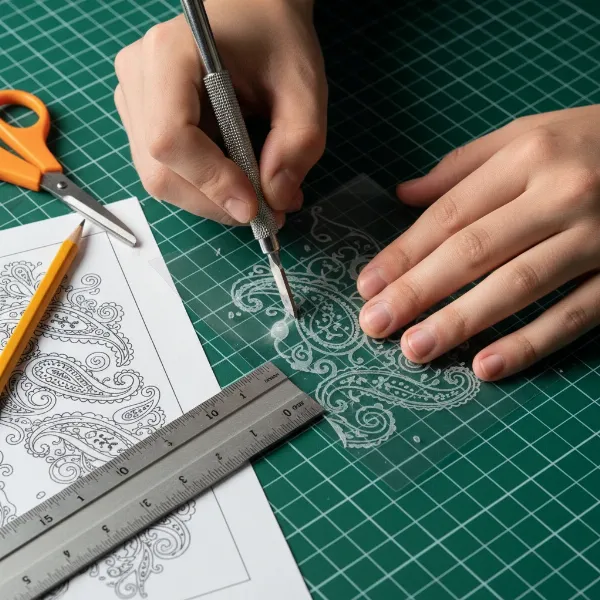 Essential tools for crafting DIY latte art stencils laid out on a cutting mat.
Material & Tool Comparison for DIY Stencils
| Feature | Paper/Cardstock | Plastic Sheets | Acrylic |
|---|---|---|---|
| Cost | Very Low | Low-Medium | Medium-High |
| Durability | Low (single-use, absorbs moisture) | Medium (reusable, flexible, washable) | High (very durable, rigid, easily washable) |
| Ease of Cutting | Very Easy (scissors, X-Acto) | Easy-Medium (X-Acto, craft knife) | Difficult (strong craft knife, Cricut, laser) |
| Washability | No | Yes (hand wash gently) | Yes (hand wash, dishwasher safe) |
| Tools Required | Scissors, X-Acto knife, cutting mat | X-Acto knife, craft knife, cutting mat | Strong craft knife, Cricut (knife blade), laser cutter |
| Best For | Beginners, quick experiments, disposable designs | Regular home use, various customizable designs | Advanced users, professional-grade, long-lasting stencils |
Tips for Perfect Latte Art with Your DIY Stencils
Creating beautiful latte art with your homemade stencils is an enjoyable process, but a few expert tips can elevate your results.
- Froth Your Milk Perfectly: The foundation of good latte art is well-frothed milk. Aim for a velvety microfoam that is smooth, shiny, and flows like wet paint, without large bubbles. The ideal temperature for steamed milk is between 140-150°F (60-65°C). Overheating can scald the milk and make it too thin for holding designs.
- Choose the Right Powder: Finely ground powders work best. Cocoa powder is a classic choice, but you can also use cinnamon, matcha powder, or even powdered sugar for different effects. Ensure your powder is fresh and clump-free.
- Hold the Stencil Correctly: Once your frothed milk is poured, gently place your DIY stencil directly on the rim of the cup. Hold it steady and as close to the foam as possible without touching it. Any gap can cause the powder to spread and blur the design.
- Dust Evenly: Using a fine-mesh shaker or a small spoon, gently tap or sprinkle your chosen powder over the stencil. Aim for an even, light layer. Too much powder can overwhelm the design and alter the taste of your drink.
- Lift with Care: The moment of truth! Once you’ve applied the powder, lift the stencil straight up and away from the cup. Avoid sliding it, as this can smudge your newly created art.
- Clean Immediately: For reusable plastic or acrylic stencils, rinse them immediately after use to prevent powder from drying and sticking to the intricate cuts. A quick wash with warm, soapy water is usually sufficient.
“Achieving that perfect microfoam is non-negotiable for stunning latte art. The smoother the milk, the sharper your stencil design will appear. Think of it as painting on a perfectly smooth canvas.” – Maria Rossi, Champion Latte Artist.
Troubleshooting Common DIY Stencil Issues
Even with the best intentions, you might encounter a few hiccups when using your DIY latte art stencils. Here’s how to troubleshoot common problems:
- Blurred or Fuzzy Edges:
- Cause: The stencil might be too far from the foam, allowing powder to spread, or the powder itself is too coarse.
- Fix: Ensure the stencil is as close to the milk foam as possible without making contact. Use a finer mesh shaker for your powder, or try a different brand of cocoa/cinnamon that is more finely ground.
- Stencil Falling into Foam or Getting Soaked:
- Cause: The stencil material might be too flimsy (e.g., thin paper), or you’re holding it unevenly.
- Fix: If using paper, consider upgrading to cardstock or plastic for more rigidity. Hold the stencil firmly by its edges or a designated handle, ensuring it’s level over the cup.
- Design Not Showing Up Clearly:
- Cause: Not enough powder was applied, the milk foam is too thin, or the design itself has too many fine, unsupported elements.
- Fix: Apply a slightly more generous (but still even) layer of powder. Focus on creating thicker, more stable microfoam. Re-evaluate your stencil design for areas that might be too delicate to hold their shape against the dusting process. Simpler designs often yield clearer results.
- Powder Clumps on Stencil:
- Cause: Moisture from steam is reaching the stencil, or the powder is old/humid.
- Fix: Ensure your stencil is completely dry before use. Store your powders in airtight containers in a cool, dry place to prevent clumping. Gently tap the shaker to break up any small clumps before dusting.
Conclusion
Embracing the world of DIY latte art stencils empowers you to infuse every cup of coffee with a touch of personal artistry. From selecting the ideal material like sturdy plastic or washable acrylic to meticulously cutting your unique designs, the journey of crafting your own stencils is as satisfying as the final sip. Not only does it offer an affordable way to customize your beverages, but it also sparks creativity and enhances the joy of your home barista experience. So, grab your materials, unleash your imagination, and transform your daily latte into a canvas for self-expression. What personalized design will you create for your next coffee moment?
Frequently Asked Questions
What’s the best material for reusable latte stencils?
For truly reusable latte stencils, thin plastic sheets (like acetate or binder dividers) or acrylic are excellent choices. Plastic is easier to cut with a craft knife and can be hand-washed, offering good durability for regular use. Acrylic provides the most professional finish and exceptional longevity but requires more robust cutting tools.
Can I use a regular printer for stencil designs?
Yes, absolutely! You can design your stencil digitally using any graphic design software or even a simple word processor, then print it out on regular paper. This printed template can then be used as a guide to trace and cut your design onto your chosen stencil material, ensuring accurate sizing and intricate details.
How do I clean my DIY plastic stencils?
Cleaning plastic or acrylic DIY stencils is straightforward. Immediately after each use, rinse the stencil under warm water to remove any lingering powder. If needed, use a mild dish soap and a soft sponge or brush to gently scrub away residue, paying attention to crevices. Allow the stencil to air dry completely before storing to prevent mildew or powder clumping.
What kind of powder works best for latte art stencils?
Finely ground, dry powders are ideal for latte art stencils. Cocoa powder is the most popular choice due to its fine texture and rich color. Other excellent options include ground cinnamon, nutmeg, or even culinary matcha powder for a vibrant green design. Always ensure the powder is fresh and free of clumps for the best results.
Can kids make DIY latte art stencils?
Yes, with appropriate supervision, kids can absolutely participate in making DIY latte art stencils! For younger children, focus on simple designs and use safer materials like thick paper or cardstock that can be cut with child-safe scissors. Adults should handle any sharp craft knives or intricate cutting, making it a fun, collaborative project for the whole family.