There’s nothing quite like the silky, sweet perfection of expertly steamed milk, enhancing your coffee or hot chocolate into a truly delightful experience. Yet, many of us have faced the disappointment of a burnt taste after using our milk steamer, turning a moment of anticipated pleasure into a bitter memory. This common issue, thankfully, is often avoidable and fixable with a little understanding and technique refinement. This guide will delve into the science behind that unwelcome burnt flavor and provide a comprehensive, step-by-step troubleshooting process to help you achieve consistently delicious, perfectly steamed milk every time.
Understanding the Burnt Taste Phenomenon in Milk Steaming
When milk takes on a burnt taste, it’s typically a sign of overheating, a process where the delicate balance of its components is disrupted. Milk contains proteins and sugars (lactose), both of which are highly sensitive to temperature. Exceeding the optimal steaming temperature causes these elements to undergo chemical changes. The proteins denature, losing their structure, while the lactose begins to caramelize excessively. This breakdown creates unpleasant, bitter compounds that manifest as a “burnt” or “cooked” flavor, entirely ruining the natural sweetness and creamy texture that perfect steamed milk should possess. Beyond the immediate impact on taste, severe overheating can also diminish some of milk’s nutritional value, making it crucial to master temperature control for both flavor and quality.
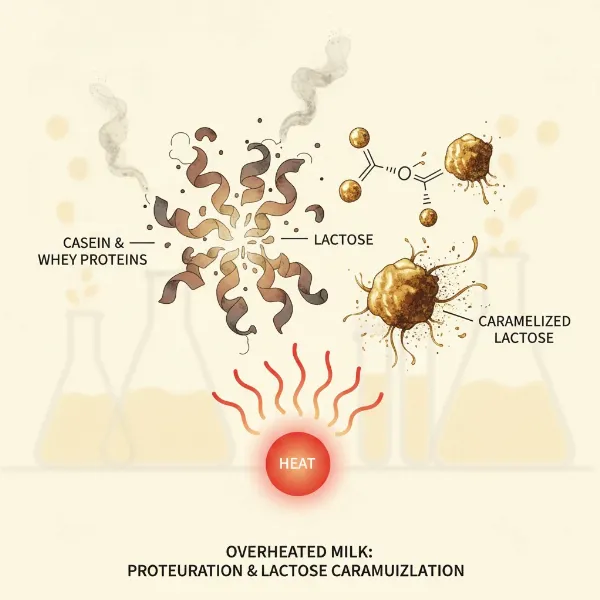 Illustration of milk components changing due to excessive heat, causing a burnt taste.
Common Causes of Burnt Milk Taste with Your Steamer
Achieving that perfect microfoam without a burnt undertone can feel like a delicate art, but understanding the common culprits behind scorched milk makes it easier to master.
Overheating the Milk
|
Our Picks for the Best Milk steamer in 2026
As an Amazon Associate I earn from qualifying purchases.
|
||
| Num | Product | Action |
|---|---|---|
| 1 | Milk Frother, 4-in-1 Electric Milk Steamer, 350ml/11.8oz Automatic Frother Machine for Coffee, Warm and Cold Foam, Temperature Control for Latte, Cappuccino, Hot Chocolate |

|
| 2 | SIMPLETASTE Milk Frother, 4-in-1 Electric Milk Steamer, Automatic Warm and Cold Foam Maker and Milk Warmer for Latte, Cappuccinos, Macchiato |
|
| 3 | SIMPLETASTE Milk Frother, 4-in-1 Electric Milk Steamer, Automatic Warm and Cold Foam Maker and Milk Warmer for Latte, Cappuccinos, Macchiato |
|
| 4 | Milk Frother, 4-in-1 Milk Frother and Steamer, 10.6oz Electric Milk Steamer, Automatic Cold and Hot Foam maker for Lattes, Cappuccinos, Ceramic Lining Interior (Polished) |
|
| 5 | Milk Frother, Paris Rhône 4-in-1 Milk Steamer and Frother, Hot & Cold Foam Milk Warmer with Temperature Control, Auto Shut-Off Frothers for Coffee, Latte, Cappuccino, Macchiato |
|
| 6 | Electric Milk Frother and Steamer, 16.9oz/500ml Milk Steamer and Frother for Latte, Dishwasher Safe, BPA Free, 4 Functions, Enjoy Perfect Milk Froth in 2 Min |
|
| 7 | HAUSHOF Milk Frother, 4-in-1 Electric Milk Frother and Steamer, Large Capacity, Hot Chocolate Maker, Automatic Warm and Cold Foam Maker for Coffee, Latte, Macchiato, Cappuccino |
|
| 8 | Milk Frother and Steamer, Large Capacity & Detachable Electric Milk Frother, Automatic Warm and Cold Foam Maker, Hot Chocolate Maker, Stainless Steel Jug, 30.44Oz./900ML |
|
| 9 | SIMPLETASTE Milk Frother, 4-in-1 Electric Milk Frother and Steamer, Automatic Warm and Cold Foam Maker and Milk Warmer for Latte, Cappuccinos, Dark Blue |
|
| 10 | Large Electric Milk Frother and Steamer, 16.9oz/500ml Milk Steamer and Frother for Latte or Hot Chocolate, Dishwasher Safe, 6 Functions, Enjoy Perfect Milk Froth in 2 Min (White-Glass) |
|
The most frequent cause of a burnt taste is simply heating the milk too much. Milk has a sweet spot for steaming, typically between 140-155°F (60-68°C). When milk exceeds this range, its sugars (lactose) caramelize excessively and its proteins begin to denature, leading to a distinct unpleasant, cooked flavor. Monitoring the temperature closely, whether with a thermometer or by touch, is crucial to stopping the steaming process at the right moment.
Incorrect Steaming Technique
Poor technique can lead to uneven heating, which can scorch parts of the milk even if the overall temperature seems acceptable. If the steam wand is submerged too deeply, or if a proper vortex isn’t created, certain areas of the milk may receive concentrated heat, leading to localized burning. Failing to introduce enough air or stretching the milk improperly can also contribute to a thinner texture that heats up too quickly.
Dirty Steamer Wand or Pitcher
Residue from previous steaming sessions on your steam wand or inside your pitcher can significantly impact the taste of fresh milk. Old, dried milk can create off-flavors that transfer to your new batch, sometimes even a “burnt plastic” taste if the boiler itself is contaminated. Thorough and immediate cleaning after each use is vital to prevent this contamination and maintain a clean taste.
Using the Wrong Type of Milk
While most milk types can be steamed, some are more forgiving than others. For instance, skim milk, with its higher protein and lower fat content, tends to scald more easily than full-fat milk. The reduced fat offers less protection against rapid temperature changes, making it more susceptible to burning if not handled carefully. Using fresh, cold, full-fat or barista-style alternative milks often yields the best results.
Steaming for Too Long
Even if the steam pressure isn’t excessively high, prolonged exposure to heat can still lead to a burnt taste. If you continue steaming past the ideal window, the milk components will eventually break down, regardless of the precise temperature. Being mindful of the duration and knowing when to stop based on temperature and volume increase is essential for preventing over-processing.
Insufficient Milk Volume
Using too little milk in your steaming pitcher can cause it to heat up very rapidly, leaving a tiny margin for error before it reaches scalding temperatures. With less volume to absorb the heat, the milk quickly overshoots the optimal range, resulting in a burnt taste. Always ensure you have an adequate amount of cold milk in your pitcher to allow for proper stretching and heating without rushing the process.
Troubleshooting Your Milk Steamer: Step-by-Step Guide
Banish the burnt taste from your steamed milk by systematically addressing potential issues. Follow these steps to refine your technique and ensure perfect results.
Step 1: Monitor Milk Temperature
The golden rule for perfect steamed milk is precise temperature control. Ideally, milk should be steamed to between 140-155°F (60-68°C). Using a thermometer is the most reliable way to achieve this consistency. Alternatively, for those without a thermometer, the “too hot to touch” rule is a good indicator: once the pitcher becomes too hot to comfortably hold for more than a second or two, it’s time to stop. This typically corresponds to the ideal temperature range and prevents the milk from reaching the scorching point, which is usually above 170°F (77°C).
Step 2: Refine Your Steaming Technique
Proper technique is critical for even heating and achieving that desirable silky microfoam. Start by submerging the steam wand tip just below the surface of cold milk to introduce air, creating a soft “paper tearing” sound. This is the “stretching” phase. Once your milk volume has increased by about 20-30%, submerge the wand deeper to create a strong vortex within the pitcher. This “texturing” phase evenly heats the milk and incorporates the air, ensuring uniform temperature and preventing localized scorching. Maintain this swirling action until the desired temperature is reached.
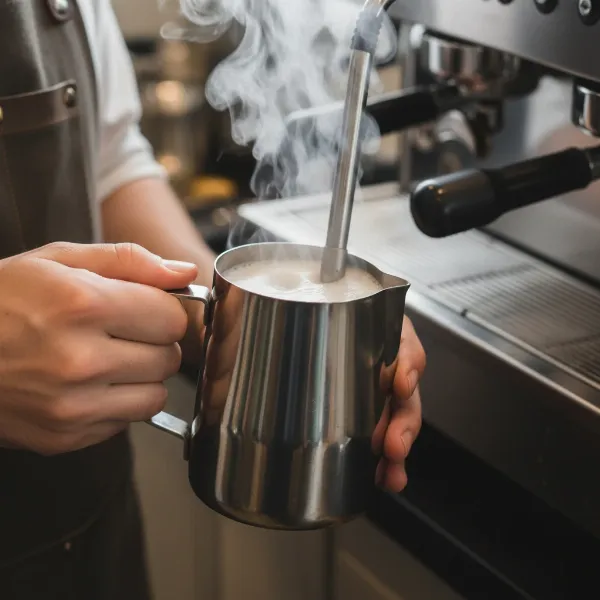 Barista demonstrating correct milk steaming technique, creating a vortex and microfoam in a pitcher.
Step 3: Maintain Impeccable Cleanliness
A clean steam wand and pitcher are non-negotiable for delicious, untainted steamed milk. Immediately after each use, wipe the steam wand thoroughly with a damp cloth to remove any milk residue before it dries and hardens. Also, remember to purge the steam wand by opening the steam valve for a second or two, which clears any milk that may have entered the internal system. The milk pitcher should be washed with soap and water after every use, ensuring no old milk can affect the flavor of your next drink.
Step 4: Choose the Right Milk
The type and freshness of milk significantly impact steaming results. Always start with fresh, cold milk, as cold milk provides a longer working window before reaching optimal temperature. While whole milk generally offers the best balance of fats and proteins for stable, creamy microfoam, many barista-style alternative milks are also formulated to steam well. If you frequently experience scorching with lower-fat milks, consider experimenting with full-fat dairy or a high-quality barista blend plant-based milk.
Step 5: Optimize Steaming Duration and Volume
Avoid overfilling or underfilling your milk pitcher. Using too little milk can cause it to heat up too quickly, leading to rapid scorching, while too much milk can overflow. Fill your pitcher between one-third to half full, allowing sufficient space for the milk to expand as it’s steamed. This correct volume, combined with mindful steaming duration, ensures a controlled heating process. Stop steaming as soon as your target temperature is met to prevent the milk from breaking down and developing a burnt taste.
Advanced Tips for Perfect, Burnt-Free Steamed Milk
Elevate your milk steaming game with these expert recommendations, ensuring every pour is smooth, sweet, and free from any unwanted burnt notes.
- Pre-chill Your Pitcher: Placing your stainless steel milk pitcher in the refrigerator or freezer for a few minutes before use can extend your steaming time. This gives you more control and reduces the risk of overheating the milk too quickly.
- Utilize a Dedicated Thermometer: While the “hand test” is useful, a good quality milk thermometer provides precise temperature readings, helping you consistently hit that sweet spot of 140-155°F (60-68°C). Clip-on thermometers are convenient and help build muscle memory for optimal temperature.
- Practice with Water and Dish Soap: If you’re struggling with technique, practice steaming with cold water and a drop of dish soap. This inexpensive method allows you to visually learn how to create a vortex and achieve different foam textures without wasting milk.
- Understand Your Specific Milk Steamer: Each milk steamer, whether it’s an espresso machine wand or a standalone frother, has unique characteristics regarding steam pressure and heating power. Spend time learning your machine’s quirks to adapt your technique accordingly.
- Listen for the “Chirping” Sound: Properly heated milk often produces a subtle “chirping” or “tearing paper” sound as it approaches its ideal temperature, indicating good aeration and even heating. A distinct lack of this sound or an overly aggressive hiss might signal an issue with your technique or steam wand placement.
Common Milk Steamer Issues and Quick Fixes
Even with the best intentions, problems can arise. Here’s how to tackle some specific issues related to a burnt taste.
Problem: Milk tastes burnt even if thermometer shows correct temperature.
- Possible Cause: Inconsistent heating within the pitcher, or the thermometer itself might be inaccurate or not correctly positioned. Sometimes, pockets of milk can overheat if not circulated properly.
- Fix: Stir the milk more actively with the steam wand to ensure even heat distribution. Verify your thermometer’s accuracy by testing it in boiling water. Make sure the thermometer probe is submerged adequately and not touching the bottom or sides of the pitcher.
Problem: Burnt taste occurs quickly, before reaching desired temperature.
- Possible Cause: Too much steam pressure for the volume of milk, too little milk in the pitcher, or potentially old/non-fresh milk. Extremely high steam pressure can scorch milk almost instantly.
- Fix: Adjust your steam pressure if your machine allows, opting for a slightly gentler flow, especially with smaller milk volumes. Always use adequate milk volume to prevent rapid heating. Ensure your milk is fresh and cold directly from the refrigerator to maximize your working time. If using an automatic frother, ensure it’s not set to an overly aggressive heating cycle.
Frequently Asked Questions
What is the ideal temperature for steaming milk without a burnt taste?
The ideal temperature for steaming milk to achieve optimal sweetness and texture without a burnt taste is typically between 140-155°F (60-68°C). Heating milk above 170°F (77°C) causes its proteins and sugars to break down, resulting in an unpleasant, scorched flavor and degraded texture.
Can using old milk cause a burnt taste when steaming?
Yes, using old milk can contribute to a burnt or off-flavor when steaming. As milk ages, its composition changes, and it becomes more susceptible to souring and protein degradation. This can make it more prone to scorching at lower temperatures and result in an undesirable taste even if not overtly “burnt.” Always use fresh, cold milk for the best steaming results.
How do I clean my milk steamer to prevent a burnt taste?
To prevent a burnt taste, always wipe your steam wand immediately after each use with a damp cloth, and purge it briefly to clear any internal milk residue. For deeper cleaning, soak detachable frother parts in hot water and dish soap, or a solution of white vinegar or lemon juice for stubborn buildup, then scrub and rinse thoroughly. Regular cleaning prevents dried milk from contaminating fresh batches.
Does the type of milk frother affect the likelihood of a burnt taste?
The type of milk frother can certainly affect the likelihood of a burnt taste. Manual steam wands on espresso machines offer the most control, but also require more skill to avoid overheating. Automatic frothers, while convenient, can sometimes overheat milk if their temperature sensors are inaccurate or if they lack precise temperature control settings. Handheld frothers generally pose less risk of “burning” the milk itself, as they mostly aerate cold milk, which is then heated separately.