The elegant swirl of a heart or the intricate layers of a rosetta transforming your morning coffee into a work of art is a delight. While often associated with skilled baristas and manual steam wands, achieving beautiful latte art is absolutely within reach for home enthusiasts using an automatic milk steamer. This guide will demystify the process, revealing how these convenient devices can produce the silky microfoam essential for stunning designs and empower you to elevate your coffee craft.
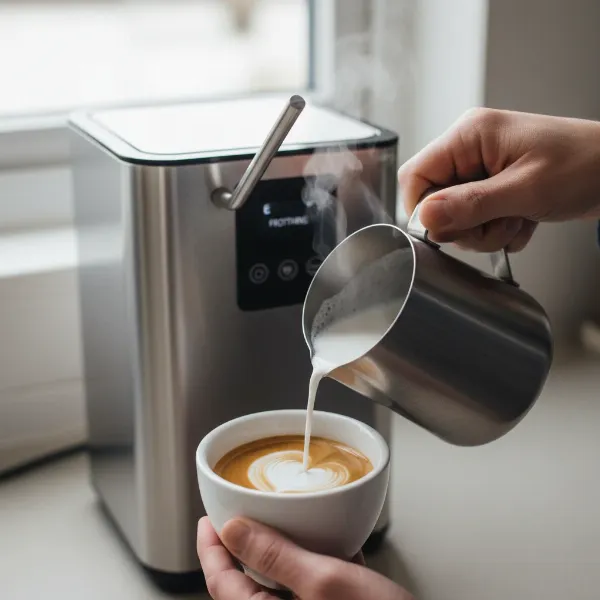 A skilled barista pouring intricate latte art using an automatic milk steamer.
What is Latte Art and How Automatic Milk Steamers Help?
Latte art is the technique of pouring steamed milk into an espresso shot to create decorative patterns on the drink’s surface. The key to successful latte art lies in achieving perfectly textured milk, known as microfoam. Microfoam is characterized by its fine, velvety consistency, free from large air bubbles, allowing it to integrate smoothly with the espresso’s crema and hold its shape.
Traditionally, microfoam is created using the powerful steam wand of an espresso machine, which requires significant practice and technique. However, modern automatic milk steamers have revolutionized this process for home users. These innovative appliances simplify milk preparation by automatically heating and frothing milk to an ideal consistency. Many advanced models even offer specific settings designed to produce the precise microfoam needed for latte art, removing much of the guesswork and making the art form accessible to everyone. They provide consistency, ease of use, and the perfect foundation for your creative pouring.
Types of Automatic Milk Steamers for Latte Art Enthusiasts
The market offers a diverse range of automatic milk steamers, each with varying capabilities for latte art. Understanding these types will help you choose the best fit for your barista aspirations.
Dedicated Automatic Milk Frothers
|
Our Picks for the Best Milk steamer in 2026
As an Amazon Associate I earn from qualifying purchases.
|
||
| Num | Product | Action |
|---|---|---|
| 1 | Milk Frother, Paris Rhône 4-in-1 Milk Steamer and Frother, Hot & Cold Foam Milk Warmer with Temperature Control, Auto Shut-Off Frothers for Coffee, Latte, Cappuccino, Macchiato |

|
| 2 | SIMPLETASTE Milk Frother, 4-in-1 Electric Milk Steamer, Automatic Warm and Cold Foam Maker and Milk Warmer for Latte, Cappuccinos, Macchiato |
|
| 3 | Milk Frother, 4-in-1 Milk Frother and Steamer, 10.6oz Electric Milk Steamer, Automatic Cold and Hot Foam maker for Lattes, Cappuccinos, Ceramic Lining Interior (Polished) |
|
| 4 | Electric Milk Frother and Steamer, 16.9oz/500ml Milk Steamer and Frother for Latte, Dishwasher Safe, BPA Free, 4 Functions, Enjoy Perfect Milk Froth in 2 Min |
|
| 5 | Milk Frother, 4-in-1 Electric Milk Steamer, 350ml/11.8oz Automatic Frother Machine for Coffee, Warm and Cold Foam, Temperature Control for Latte, Cappuccino, Hot Chocolate |
|
| 6 | Milk Frother and Steamer, Large Capacity & Detachable Electric Milk Frother, Automatic Warm and Cold Foam Maker, Hot Chocolate Maker, Stainless Steel Jug, 30.44Oz./900ML |
|
| 7 | HAUSHOF Milk Frother, 4-in-1 Electric Milk Frother and Steamer, Large Capacity, Hot Chocolate Maker, Automatic Warm and Cold Foam Maker for Coffee, Latte, Macchiato, Cappuccino |
|
| 8 | SIMPLETASTE Milk Frother, 4-in-1 Electric Milk Frother and Steamer, Automatic Warm and Cold Foam Maker and Milk Warmer for Latte, Cappuccinos, Dark Blue |
|
| 9 | SIMPLETASTE Milk Frother, 4-in-1 Electric Milk Steamer, Automatic Warm and Cold Foam Maker and Milk Warmer for Latte, Cappuccinos, Macchiato |
|
| 10 | Large Electric Milk Frother and Steamer, 16.9oz/500ml Milk Steamer and Frother for Latte or Hot Chocolate, Dishwasher Safe, 6 Functions, Enjoy Perfect Milk Froth in 2 Min (White-Glass) |
|
These standalone devices are designed solely for frothing and heating milk. While many produce general foam for cappuccinos or lattes, some premium models are engineered to create the delicate microfoam required for latte art. They often feature various temperature and froth settings. For instance, certain high-end frothers might have a “latte art” specific option on their integrated touch screen, or come with specialized whisks that promote finer aeration. Handheld electric milk frothers can also be used, though they demand a more hands-on technique to achieve suitable microfoam. With these, the user must carefully angle the frother and swirl the milk to incorporate air gradually and create a vortex, minimizing large bubbles.
Espresso Machines with Integrated Automatic Steam Wands/Texturing
Many semi-automatic and super-automatic espresso machines come equipped with integrated automatic steaming or milk texturing systems. These machines take milk directly from a carafe or pitcher and automatically steam it to a programmed temperature and texture. Some advanced models even allow users to customize the froth level and temperature, enabling the production of latte art-quality microfoam with minimal manual intervention. The automation here ensures repeatable results, making it easier to focus on the pouring technique itself rather than perfect milk steaming.
Features for Latte Art in Automatic Milk Steamers
When selecting an automatic milk steamer specifically for latte art, certain features are paramount. The ability to produce fine, silky microfoam is the ultimate goal, and these attributes contribute significantly:
| Feature | Benefit for Latte Art | Ideal Setting/Quality |
|---|---|---|
| Programmable Settings | Enables consistent microfoam for different drink types. | “Latte Art” preset, adjustable foam levels. |
| Precise Temperature Control | Ensures optimal milk protein structure for pourability. | 140-155°F (60-68°C) for dairy, 140-150°F for plant-based. |
| Microfoam Quality | Smooth, velvety, free from large bubbles. | Fine, glossy texture; paint-like consistency. |
| Ease of Use for Latte Art | Simplifies the milk prep, allowing focus on pouring. | One-touch operation, clear indicators for readiness. |
| Pitcher Design | Aids in swirling and pouring precise patterns. | Stainless steel, pointed spout, comfortable handle. |
| Cleaning & Maintenance | Ensures hygiene and consistent performance over time. | Dishwasher-safe components, non-stick interior. |
Choosing the Right Automatic Milk Steamer for Latte Art
Selecting the ideal automatic milk steamer involves considering several factors to match your specific needs and skill level. Identifying these will guide you toward a product that truly supports your latte art journey.
First, determine your usage needs. How often will you make lattes? Are you serving a single cup or multiple? Do you want to experiment with complex designs or simply enjoy a perfect heart? This helps gauge the required durability and feature set. Next, consider your budget. Automatic milk steamers range widely in price, from affordable handheld frothers to integrated systems on high-end espresso machines. Establishing a budget early will narrow down your options significantly.
Material and design are also important. Stainless steel pitchers are durable, easy to clean, and help in temperature management. A pitcher with a pointed spout is crucial for precise pouring. Look for key features such as adjustable temperature control, settings for different foam densities (especially a “latte art” specific option if available), and the ability to make both hot and cold froth. Finally, research reputable brands known for producing quality milk frothing equipment and good customer support. Reading reviews can provide insights into a model’s actual microfoam quality and ease of use for latte art.
Top Automatic Milk Steamers for Latte Art
While specific product recommendations can vary with market trends, certain categories of automatic milk steamers consistently deliver results suitable for latte art. These systems prioritize the creation of silky microfoam, offering convenience without compromising quality.
High-End Integrated Systems: These are typically found on advanced semi-automatic or super-automatic espresso machines. They boast sophisticated automatic milk texturing, often with customizable settings for temperature and foam density. Machines like the Nespresso Creatista series, for example, feature automatic steam wands that consistently produce the fine microfoam needed for intricate designs. Their seamless integration means less fuss and more focus on your pouring technique.
Advanced Standalone Frothers: For those who already have an espresso machine or prefer a separate unit, advanced automatic milk frothers can be excellent. Some models, like the Nespresso Barista Milk Frother, specifically include a “latte art” option that precisely controls aeration and temperature. These dedicated devices are designed to yield a pourable, glossy microfoam that mimics the texture achieved by skilled baristas with traditional steam wands, offering convenience and consistent results.
Budget-Friendly Handheld Options (with careful technique): While not fully “automatic” in the sense of one-touch operation, a good quality handheld electric milk frother, combined with specific techniques, can also produce acceptable microfoam. The key is to swirl cold milk in a pitcher at an angle, introducing air slowly and creating a vortex to prevent large bubbles. While challenging, consistent practice can lead to decent results for simple designs, making it a great entry point for beginners.
Mastering the Microfoam: Tips for Automatic Milk Steamer Users
Achieving the perfect microfoam is the cornerstone of great latte art, even with an automatic milk steamer. The right preparation ensures your machine can perform at its best.
Always start with cold, fresh milk. Whole dairy milk is generally recommended due to its ideal balance of fat and protein, which contributes to stable, velvety microfoam. However, many barista-blend plant-based milks, such as oat or almond milk, can also produce excellent results. With plant-based alternatives, pay close attention to the recommended temperature, as some can separate or curdle if overheated. Fill your pitcher or the automatic steamer’s reservoir to the recommended milk level—usually indicated inside the pitcher—to allow for proper aeration and expansion.
Once the automatic steamer has completed its cycle, the milk often requires a crucial post-frothing technique to become truly “pourable.” This involves gently tapping the bottom of the pitcher on a countertop a few times to pop any remaining large bubbles. Immediately follow this with a vigorous swirling motion, often called “grooming” or “polishing.” This integrates the denser liquid milk with the airier foam, creating a consistent, glossy, paint-like texture that is essential for smooth pouring and distinct art. The ideal temperature for dairy milk microfoam is typically between 140-155°F (60-68°C); overheating can degrade the milk’s proteins, leading to bubbly, unworkable foam. If your automatic steamer has temperature settings, ensure it’s set within this optimal range.
The Art of the Pour: Step-by-Step Latte Art Techniques
With perfectly textured milk from your automatic steamer and a freshly brewed espresso, you are ready to unleash your inner artist. The pouring technique is where the magic truly happens, transforming your coffee into a visual masterpiece.
First, prepare your coffee canvas. Always use a freshly pulled espresso shot with a rich, reddish-brown crema, as this forms the base for your art. The crema provides contrast and allows the white microfoam to stand out. Swirl your espresso gently in its cup to ensure the crema is integrated and even. A wide-mouthed cup is generally easier to pour into.
The pour itself consists of two main phases:
The Integration Pour
Begin by tilting your coffee cup towards you at about a 45-degree angle. Hold your milk pitcher high, several inches above the cup, and start pouring a thin, steady stream of milk directly into the center of the espresso. The goal here is to allow the milk to dive beneath the surface of the crema, mixing with the espresso and creating a uniform, light brown canvas without showing any white foam yet. Continue this high pour until the cup is about half to two-thirds full.
The Design Pour
As the cup fills, gradually lower the pitcher until its spout is very close to the surface of the coffee, almost touching the crema. At the same time, level out your coffee cup slightly. Increase the speed of your pour, allowing the white microfoam to emerge and float on top of the liquid coffee. This is where you create your design:
- Heart: Keep the pitcher close to the surface, pouring steadily into the center until a white circular shape appears. As the cup almost fills, lift the pitcher slightly and draw a straight line through the center of the white circle, cutting it to form the distinct heart shape.
- Tulip: Begin with a small, steady pour to form a base circle. Then, pull the pitcher back slightly and pour another, slightly smaller circle in front of the first. Repeat this, stacking two or three “leaves.” Finally, lift the pitcher high and draw a single line through the center of all the stacked circles to form the stem of the tulip.
- Rosetta: Start by pouring a small base circle close to the surface. As foam appears, begin a gentle, controlled side-to-side “wiggle” motion with your wrist, moving the pitcher backward through the cup. This creates the layered, leafy pattern. Once you reach the far edge of your design, lift the pitcher and swiftly draw a line through the center of the “leaves” to create the rosetta’s spine.
Remember, practice is key. Don’t be discouraged by initial imperfections; each pour is a learning opportunity.
 Various latte art designs being poured, including a heart, tulip, and rosetta.
Common Latte Art Mistakes and How to Troubleshoot
Even with an automatic milk steamer, learning latte art can present some common challenges. Recognizing these issues and knowing how to troubleshoot them will significantly speed up your progress.
One of the most frequent problems is incorrect milk texture. If your milk is too thin and watery, it will simply pour through the espresso without forming a pattern. This often happens if the automatic frother didn’t incorporate enough air or if the milk wasn’t groomed adequately after frothing. Conversely, if the milk is too thick, bubbly, or resembles shaving cream, it won’t flow smoothly, resulting in blotchy or undefined art. This indicates too much air was introduced or the milk was overheated. To troubleshoot, review your machine’s settings to ensure it’s on a “latte” or “microfoam” setting, use fresh, cold whole milk, and always tap and swirl your milk vigorously after frothing to achieve a consistent, glossy texture.
Poor pouring technique is another hurdle. If your designs are off-center or asymmetrical, check your body posture and ensure you’re pouring directly into the center of the cup. Starting the pattern too late, or pouring too slowly, can cause the foam to separate from the liquid milk, leaving a “wispy” or indistinct design. Pouring too fast can break the espresso’s crema, leading to a muddy canvas. Practice the two-phase pour: a high, thin stream for integration, followed by a low, faster pour for the art. If your milk separates quickly, ensure you are pouring immediately after grooming. With automatic steamers, consistency is often higher, allowing you to focus more on perfecting your pour mechanics.
Conclusion
Creating captivating latte art with an automatic milk steamer transforms your home coffee experience into an artistic endeavor. While these convenient machines simplify the milk preparation, mastering the art requires attention to detail in achieving perfect microfoam and refining your pouring technique. By selecting the right steamer, understanding the nuances of milk texturing, and diligently practicing the steps—from the initial high pour to the delicate design phase—you can consistently produce beautiful patterns. Embrace the process, experiment with different designs, and soon you’ll be delighting yourself and your guests with café-quality lattes.
What new latte art design will you try to master first on your journey to becoming a home barista artist?
Frequently Asked Questions
Which automatic milk steamer is best for beginners learning latte art?
For beginners, an automatic milk steamer with dedicated “latte art” or “microfoam” settings is highly recommended. These models, often found integrated into advanced espresso machines or as standalone frothers, simplify milk texturing, allowing new users to focus primarily on mastering the pouring technique without the complexities of manual steaming.
Can all automatic milk frothers make microfoam suitable for latte art?
No, not all automatic milk frothers can produce the fine, velvety microfoam required for latte art. Many are designed for thicker, stiffer foam suitable for cappuccinos. Look for frothers specifically advertised with “latte art” settings or those that emphasize a smooth, liquid-like microfoam texture.
What kind of milk works best for latte art with an automatic steamer?
Whole dairy milk is generally considered ideal due to its fat and protein content, which creates stable microfoam. Barista-edition plant-based milks, especially oat and almond, are excellent alternatives. Always use cold milk and ensure it’s not over-heated by the automatic steamer to prevent protein breakdown and large bubbles.
How do I ensure my milk is perfectly textured by an automatic steamer for latte art?
After your automatic steamer finishes, gently tap the pitcher on the counter to eliminate large air bubbles. Immediately swirl the milk vigorously until it has a glossy, uniform, paint-like consistency. This “grooming” step is crucial for integrating the foam and liquid, making it pourable for intricate designs.
What are the essential pouring techniques for latte art with automatically frothed milk?
The pouring technique involves two stages: first, a high, thin stream into the center of the tilted cup to integrate milk under the espresso’s crema. Second, lower the pitcher close to the surface and increase the pour speed, using controlled movements (like wiggling for a rosetta or drawing a line for a heart) to create your desired pattern.