The Bellman stovetop steamer is a beloved tool for coffee aficionados seeking cafe-quality frothed milk at home. Its robust build and ability to generate powerful steam rival much larger, more expensive machines. Yet, for some, the idea of a pressurized stovetop device can evoke a hint of apprehension, particularly regarding safety. While the notion of a Bellman “exploding” is a dramatic overstatement of what might occur with improper use, understanding and respecting its pressure system is key to enjoying perfectly frothed milk without incident. This guide will walk you through the essential steps for safe operation, precise milk steaming techniques, and vital maintenance tips, transforming any apprehension into confidence.
The Bellman Steamer: A Powerful Tool, Understood
What is a Bellman Steamer?
|
Our Picks for the Best Milk steamer in 2026
As an Amazon Associate I earn from qualifying purchases.
|
||
| Num | Product | Action |
|---|---|---|
| 1 | SIMPLETASTE Milk Frother, 4-in-1 Electric Milk Steamer, Automatic Warm and Cold Foam Maker and Milk Warmer for Latte, Cappuccinos, Macchiato |

|
| 2 | Milk Frother and Steamer, Large Capacity & Detachable Electric Milk Frother, Automatic Warm and Cold Foam Maker, Hot Chocolate Maker, Stainless Steel Jug, 30.44Oz./900ML |
|
| 3 | Milk Frother, 4-in-1 Electric Milk Steamer, 350ml/11.8oz Automatic Frother Machine for Coffee, Warm and Cold Foam, Temperature Control for Latte, Cappuccino, Hot Chocolate |
|
| 4 | SIMPLETASTE Milk Frother, 4-in-1 Electric Milk Frother and Steamer, Automatic Warm and Cold Foam Maker and Milk Warmer for Latte, Cappuccinos, Dark Blue |
|
| 5 | Electric Milk Frother and Steamer, 16.9oz/500ml Milk Steamer and Frother for Latte, Dishwasher Safe, BPA Free, 4 Functions, Enjoy Perfect Milk Froth in 2 Min |
|
| 6 | SIMPLETASTE Milk Frother, 4-in-1 Electric Milk Steamer, Automatic Warm and Cold Foam Maker and Milk Warmer for Latte, Cappuccinos, Macchiato |
|
| 7 | HAUSHOF Milk Frother, 4-in-1 Electric Milk Frother and Steamer, Large Capacity, Hot Chocolate Maker, Automatic Warm and Cold Foam Maker for Coffee, Latte, Macchiato, Cappuccino |
|
| 8 | Milk Frother, Paris Rhône 4-in-1 Milk Steamer and Frother, Hot & Cold Foam Milk Warmer with Temperature Control, Auto Shut-Off Frothers for Coffee, Latte, Cappuccino, Macchiato |
|
| 9 | Large Electric Milk Frother and Steamer, 16.9oz/500ml Milk Steamer and Frother for Latte or Hot Chocolate, Dishwasher Safe, 6 Functions, Enjoy Perfect Milk Froth in 2 Min (White-Glass) |
|
| 10 | Milk Frother, 4-in-1 Milk Frother and Steamer, 10.6oz Electric Milk Steamer, Automatic Cold and Hot Foam maker for Lattes, Cappuccinos, Ceramic Lining Interior (Polished) |
|
A Bellman steamer is a stovetop milk frother designed to produce high-quality steam for texturing milk. Unlike electric frothers that simply whisk milk, the Bellman operates by heating water to create pressurized steam, which is then released through a steam wand. This manual process gives you precise control over the aeration and heating of your milk, allowing for the creation of velvety microfoam essential for lattes, cappuccinos, and latte art. Its compact size, durable stainless steel construction, and ability to work on various heat sources, including campfires, make it a versatile choice for both home baristas and adventurers.
Understanding the “Explosion” Concern
The term “exploding” often refers to an uncontrolled release of pressure, which can forcefully eject parts or superheated water/steam. With the Bellman, this risk primarily stems from a fundamental misunderstanding or disregard of its pressure-building mechanics and safety features. A Bellman is built with a safety release valve designed to vent excess pressure, acting as a crucial safeguard. However, relying solely on this valve to manage pressure indicates improper operation. True “explosions,” where the device shatters, are extremely rare with a properly maintained Bellman. Instead, incidents typically involve forceful expulsion of the lid or water due to neglected seals, overfilling, or blocked steam wands combined with excessive pressure buildup. By understanding and adhering to simple safety protocols, these incidents are entirely preventable, ensuring only smooth, creamy microfoam, not chaos.
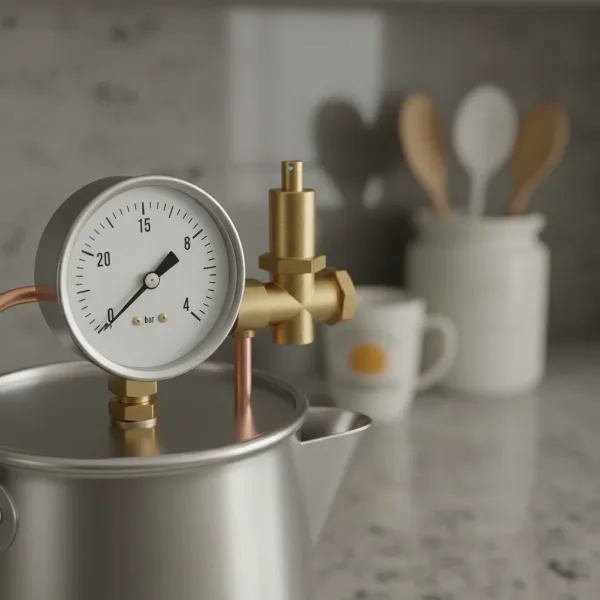 Close-up of a Bellman stovetop steamer's safety valve and pressure gauge, illustrating proper pressure management.
Preventing Incidents: Essential Safety Guidelines
Proper Water Level and Filling
Correct water levels are paramount for safe and efficient operation. Never place your Bellman steamer on a heat source without water inside, as this can severely damage the unit and create a hazardous situation. For Bellman 50SS or CX-25S models primarily used for steaming, fill the unit between one-quarter and one-half full for the best results. Crucially, do not fill past the halfway mark to allow adequate space for steam to form safely. Using hot water to fill the steamer can help speed up the heating process, getting you to perfect microfoam faster.
Securing the Seals and O-Rings
The Bellman relies on its seals and O-rings to contain the high pressure needed for steaming. Before each use, always ensure the lid is screwed on tightly and securely. Regularly inspect all rubber seals and O-rings for any signs of wear, cracks, or damage. A compromised seal is a direct pathway for pressure to escape uncontrollably, potentially leading to the forceful ejection of the lid or hot contents.
“The integrity of your Bellman’s seals is paramount for safe operation. A compromised O-ring is an invitation for trouble.” – Dr. Eleanor Vance, Thermodynamics Engineer and Coffee Enthusiast.
It’s particularly important to note that the bottom O-ring on CX-25 series models is critical for safety. Replacing it yourself without proper tools or knowledge of specific torque requirements can be dangerous and should be approached with extreme caution, ideally by contacting the manufacturer.
Pressure Management: The Heart of Safe Operation
Understanding and actively managing pressure is the most critical aspect of safe Bellman operation.
- How Pressure Builds: As the water inside the sealed unit heats, it turns into steam, increasing the internal pressure. This pressure is what forces steam through the wand.
- The Safety Release Valve: Your Bellman is equipped with a safety release valve that will automatically vent steam if the internal pressure becomes too high. However, if this valve is frequently activated, it indicates that you are operating the unit outside of safe parameters. This is not a mechanism to rely on for normal pressure control.
- Active Venting is Key: To safely monitor and control the pressure, you must actively vent the steam wand. This means periodically opening the steam knob for a brief moment to check the strength and dryness of the steam jet. When you achieve a strong, steady jet of dry steam, your unit is at optimal steaming pressure.
- Optimal Steaming Pressure: For ideal milk texturing, aim for an internal pressure of 1.5 to 2 bar.
- Pro Tip for Extra Safety: Some experienced users find an “extra layer of safety” by leaving the steam wand slightly ajar during the initial heating phase. This allows a very small, controlled amount of steam to escape, preventing rapid, unchecked pressure buildup.
Step-by-Step Guide: Using Your Bellman Steamer Safely
Mastering your Bellman is a rewarding process. Follow these steps for safe operation and consistently perfect microfoam:
Initial Setup and Heating
- Fill with Water: Ensure the unit is clean and filled with cold water, observing the recommended levels (between ¼ and ½ full for steaming-focused models).
- Secure the Lid: Tightly screw on the lid, ensuring all seals are properly seated.
- Place on Heat: Place your Bellman on your chosen heat source, set to medium-high.
- Initial Venting: As the water heats, open the steam knob fully. Water will boil, and eventually, steam will begin to vent. Allow it to vent for a few seconds to clear any condensation, then close the steam knob.
- Build Pressure: Reduce the heat to medium. Allow the unit to continue heating. Periodically open the steam knob briefly to check the pressure. You are looking for a strong, steady, and dry jet of steam, indicating sufficient internal pressure. This process typically takes a few minutes after the initial venting.
Steaming Milk for Perfect Microfoam
- Prepare Milk: Pour cold, fresh milk into a stainless steel frothing pitcher. The colder the milk, the more time you have to texture it.
- Position Wand: Once your Bellman is at optimal pressure, submerge the tip of the steam wand just below the surface of the milk. Position it slightly off-center to create a vortex.
- Open Valve: Open the steam valve fully and quickly.
- Aeration (“Stretching”): Keep the wand tip near the surface for the first few seconds to incorporate air, creating fine bubbles. Listen for a subtle “tearing paper” sound. This “stretches” the milk.
- Texturing (“Rolling”): Once the milk volume has increased by about 20-30%, lower the pitcher slightly, submerging the wand tip deeper. This creates a rolling motion, integrating the air and heating the milk evenly to create a silky, homogeneous microfoam.
- Stop Steaming: Continue until the pitcher is too hot to hold comfortably (around 140-150°F or 60-65°C). Turn off the steam valve, then remove the pitcher.
 Hands demonstrating steaming milk with a Bellman steamer, creating perfect microfoam for latte art.
“For truly velvety microfoam, the Bellman is unparalleled among stovetop options. The secret lies in a cold starting temperature for your milk and a keen ear for the distinct ‘tearing paper’ sound during the aeration phase.” – Chef Antoine Dubois, Award-winning Barista and Culinary Instructor.
Post-Steaming Routine
- Clean Wand Immediately: As soon as you’ve finished steaming, wipe the steam wand thoroughly with a damp cloth. This prevents milk from drying and hardening inside the wand.
- Purge Wand: Open the steam valve briefly to purge any residual milk from the wand’s interior. This is crucial for hygiene and preventing blockages.
- Cool Down: Turn off the heat source and allow your Bellman to cool down naturally before disassembling or cleaning the main unit.
Common Issues and Troubleshooting
Even with careful use, you might encounter a few common issues. Here’s how to address them:
- No Steam or Weak Steam:
- Low Water Level: Ensure the unit has enough water.
- Insufficient Heat/Pressure: Allow more time on the stove to build pressure, or increase heat slightly (while monitoring).
- Clogged Steam Wand: Milk residue can block the wand. Clean and purge after every use. If persistent, unscrew the tip for a deeper clean.
- Safety Valve Stuck Open: If the safety valve vents frequently, it can sometimes stick open, preventing pressure buildup. Contact Bellman support for instructions on how to reset it if this occurs.
- Excessive Pressure Release (Safety Valve Hissing):
- This means the internal pressure is too high. Reduce the heat source immediately. This is the valve doing its job, but it indicates you need to manage pressure more actively by venting the wand and controlling the heat.
- Leaking or Splattering:
- Loose Lid/Worn Seals: Double-check that the lid is screwed on tightly and inspect all seals for damage. Replace any worn seals.
- Overfilling: Ensure you haven’t filled the water past the recommended maximum level.
- If your model brews espresso (CX-25P): An “explosive jet of superheated water” can occur if the coffee valve is opened too much without sufficient back pressure from the coffee grounds.
Maintenance for Longevity and Safety
Regular maintenance extends the life of your Bellman and ensures continued safe operation.
- Daily Cleaning: Immediately after each use, clean and purge the steam wand.
- Seal Inspection: Routinely inspect all rubber O-rings and seals for signs of wear, hardening, or cracking. While Bellman’s warranty typically excludes consumables like seals, replacing them when needed is vital for safety.
- Deep Cleaning/Descaling: Depending on your water quality, you may need to descale your Bellman periodically. Follow the manufacturer’s instructions for descaling, typically using a food-safe descaling solution.
- Proper Storage: Store your Bellman in a clean, dry place when not in use.
Conclusion
The Bellman stovetop steamer is a remarkably effective and durable tool for crafting exquisite milk-based coffee beverages. The key to unlocking its full potential, while ensuring safety, lies in understanding and respecting its fundamental mechanics of pressure. By meticulously following guidelines for water levels, maintaining seals, and actively managing internal pressure through regular venting, you can confidently eliminate any “explosion” concerns. Embrace the process, master the technique, and your Bellman will consistently deliver the velvety microfoam that transforms an ordinary coffee into a cafe-quality experience. So, are you ready to elevate your home barista game? What’s your go-to Bellman steamed drink?
Frequently Asked Questions
What pressure is safe for steaming milk with a Bellman?
The optimal pressure for steaming milk with a Bellman steamer is between 1.5 and 2 bar. While the safety release valve will activate if pressure exceeds safe limits, relying on it to vent steam indicates that the operating pressure is too high for ideal steaming and safe practice. Always aim for a strong, steady, dry steam jet by actively venting the wand.
Can I leave my Bellman Steamer unattended while heating?
No, it is strongly advised not to leave your Bellman steamer unattended while it is heating on the stove. Active monitoring is required, especially during the pressure-building phase. You need to periodically vent the steam wand to check for optimal pressure and ensure the unit is not overheating, which could lead to the safety valve activating.
How often should I replace the O-rings on my Bellman Steamer?
The frequency of O-ring replacement depends on usage and maintenance. You should inspect your Bellman’s O-rings regularly for any signs of wear, such as cracking, hardening, or loss of elasticity. If you notice any leaks, difficulty sealing, or visible damage, it’s time to replace them. While O-rings are considered consumables and are not typically covered by warranty, their integrity is crucial for safe and effective operation.