Dreaming of café-quality lattes and cappuccinos with silky, velvety microfoam, but only have a basic handheld frother? You’re not alone. Many believe that achieving true microfoam—the kind that makes latte art possible and elevates your coffee experience—requires expensive, professional equipment. However, with the right technique and a little patience, your affordable handheld frother can become your secret weapon for crafting exquisite milk texture at home. This guide will walk you through everything you need to know, from understanding microfoam to mastering the exact steps, ensuring you can impress yourself and your guests without breaking the bank.
Understanding Microfoam: The Heart of Great Coffee
Microfoam is more than just foamed milk; it’s a specific texture characterized by tiny, uniform bubbles, giving the milk a smooth, velvety consistency. Unlike stiff, bubbly froth, microfoam seamlessly integrates with espresso, enhancing the coffee’s natural sweetness and creating a rich, creamy mouthfeel. It’s what allows skilled baristas to pour intricate latte art designs, but its true magic lies in the superior taste and texture it brings to your favorite milk-based beverages.
The science behind microfoam involves a delicate balance of milk proteins, fats, and temperature. When air is introduced into milk, the proteins denature and surround the air, stabilizing the bubbles. Milk fat contributes to the creamy texture, while heating milk enhances its natural sweetness by breaking down lactose. The key is to create very small, stable bubbles and thoroughly integrate them into the liquid milk, preventing separation and ensuring that coveted smooth finish. Whole milk is generally considered the best for frothing due to its ideal protein and fat content, but many non-dairy alternatives, particularly oat milk, can also yield excellent results.
The Humble Handheld Frother: Your Budget Barista Tool
Handheld frothers are often underestimated. These battery-operated devices, typically featuring a small whisk at the end, are celebrated for their affordability, portability, and ease of use. While they may lack the power and precision of an espresso machine’s steam wand, their simplicity is also their strength. They allow for direct control over the frothing process, which, when understood correctly, can be leveraged to produce impressive microfoam.
The biggest limitation of a cheap handheld frother lies in its inability to simultaneously heat and texture milk to precise temperatures, a capability inherent in professional steam wands. This means you’ll need to manage the milk temperature separately. However, this isn’t an insurmountable hurdle. With a bit of technique, patience, and attention to detail, a basic handheld frother can transform ordinary milk into a luxurious, pourable microfoam, proving that you don’t need fancy gadgets to enjoy café-quality drinks.
Essential Ingredients & Tools for Microfoam Success
Before diving into the frothing process, ensure you have the right components in place. The quality and condition of your ingredients and tools significantly impact your results.
- Milk: The type and temperature of your milk are paramount.
- Type: Whole milk is often recommended for its optimal fat and protein content, leading to a stable and creamy foam. However, oat milk has gained popularity among baristas for its excellent frothing capabilities and creamy texture. Soy milk can also work well, while almond milk tends to produce a lighter foam. Experiment to find your favorite.
- Temperature: Always start with fresh, cold milk, ideally straight from the refrigerator. Cold milk takes longer to heat up, providing more time to incorporate air and create fine bubbles before the milk gets too hot and the foam becomes unstable.
- Vessel: A tall, narrow pitcher is ideal.
- Material: A stainless steel milk pitcher with a pour spout is highly recommended. Metal helps you monitor temperature by touch and allows for the necessary swirling motion. The pour spout is crucial for controlled pouring, especially if you plan to attempt latte art.
- Size: Fill the pitcher to about one-third of its capacity to allow ample room for the milk to expand as it froths.
- The Handheld Frother: Your primary tool needs to be in top condition.
- Cleanliness: Always ensure your frother whisk is spotless. Milk residue can affect frothing performance and introduce unwanted bacteria.
- Power: Check that your batteries are fresh. A frother losing power will struggle to create the necessary vortex and fine bubbles.
Step-by-Step Guide to Crafting Perfect Microfoam
Making microfoam with a handheld frother involves two critical stages: aeration (introducing air) and incorporation (blending the air into the milk).
1. Preparation: The Foundation for Foam
|
Our Picks for the Best Milk steamer in 2026
As an Amazon Associate I earn from qualifying purchases.
|
||
| Num | Product | Action |
|---|---|---|
| 1 | SIMPLETASTE Milk Frother, 4-in-1 Electric Milk Steamer, Automatic Warm and Cold Foam Maker and Milk Warmer for Latte, Cappuccinos, Macchiato |

|
| 2 | SIMPLETASTE Milk Frother, 4-in-1 Electric Milk Frother and Steamer, Automatic Warm and Cold Foam Maker and Milk Warmer for Latte, Cappuccinos, Dark Blue |
|
| 3 | Large Electric Milk Frother and Steamer, 16.9oz/500ml Milk Steamer and Frother for Latte or Hot Chocolate, Dishwasher Safe, 6 Functions, Enjoy Perfect Milk Froth in 2 Min (White-Glass) |
|
| 4 | Milk Frother and Steamer, Large Capacity & Detachable Electric Milk Frother, Automatic Warm and Cold Foam Maker, Hot Chocolate Maker, Stainless Steel Jug, 30.44Oz./900ML |
|
| 5 | HAUSHOF Milk Frother, 4-in-1 Electric Milk Frother and Steamer, Large Capacity, Hot Chocolate Maker, Automatic Warm and Cold Foam Maker for Coffee, Latte, Macchiato, Cappuccino |
|
| 6 | Milk Frother, Paris Rhône 4-in-1 Milk Steamer and Frother, Hot & Cold Foam Milk Warmer with Temperature Control, Auto Shut-Off Frothers for Coffee, Latte, Cappuccino, Macchiato |
|
| 7 | Milk Frother, 4-in-1 Electric Milk Steamer, 350ml/11.8oz Automatic Frother Machine for Coffee, Warm and Cold Foam, Temperature Control for Latte, Cappuccino, Hot Chocolate |
|
| 8 | SIMPLETASTE Milk Frother, 4-in-1 Electric Milk Steamer, Automatic Warm and Cold Foam Maker and Milk Warmer for Latte, Cappuccinos, Macchiato |
|
| 9 | Milk Frother, 4-in-1 Milk Frother and Steamer, 10.6oz Electric Milk Steamer, Automatic Cold and Hot Foam maker for Lattes, Cappuccinos, Ceramic Lining Interior (Polished) |
|
| 10 | Electric Milk Frother and Steamer, 16.9oz/500ml Milk Steamer and Frother for Latte, Dishwasher Safe, BPA Free, 4 Functions, Enjoy Perfect Milk Froth in 2 Min |
|
Pour your chosen cold milk into your clean, tall pitcher, filling it no more than one-third full. This ensures enough space for the milk to expand without overflowing. Having a thermometer handy (clip-on or instant-read) is highly beneficial, especially when you’re starting, to monitor the milk’s temperature accurately.
2. Aeration (The “Stretching” Phase): Introducing Air
This is where you introduce air into the cold milk, creating the initial layer of foam.
- Position: Submerge the whisk of your handheld frother just below the surface of the milk. You want the whisk to gently break the surface tension, allowing air to be drawn in.
- Technique: Turn on your frother. You should hear a soft, gentle “hissing” sound, similar to tearing paper, indicating that air is being incorporated. Move the frother very slowly and gently in small circles around the edge of the pitcher or subtly up and down, keeping the whisk at the surface.
- Duration: Continue this aeration for about 5-10 seconds for a small amount of milk. The goal is to increase the milk volume by roughly 10-20% and create a thin layer of fine bubbles, not large, unruly ones. If you see large bubbles, the frother might be too high.
3. Incorporation (The “Texturing” Phase): Creating Velvety Smoothness
Once you’ve introduced enough air, the next step is to blend these bubbles into the milk, transforming them into microfoam.
- Position: Lower the handheld frother deeper into the milk, ensuring the whisk is fully submerged. The frother should now be positioned midway between the surface and the bottom of the pitcher.
- Technique: Hold the frother relatively still or move it in a slow, controlled circular motion at this depth. The aim is to create a strong vortex within the milk, which helps churn and refine the larger bubbles into smaller, more uniform ones. You’ll notice the milk swirling vigorously and the sound becoming quieter as the air is integrated.
- Duration: Continue this phase until the milk reaches your desired temperature. This is where your thermometer comes in handy.
4. Temperature Monitoring: The Sweet Spot
For the best flavor and texture, aim for a final milk temperature between 140°F and 155°F (60°C to 68°C). Going too hot (above 160°F or 70°C) will scald the milk, causing it to lose its sweetness and develop an unpleasant, burnt taste, and the foam will likely separate quickly. Below 140°F, the milk might not be sweet enough, and the foam might not be as stable. Remove the frother once the desired temperature is reached.
5. Refinement: Tapping and Swirling
This crucial final step helps achieve that signature glossy, pourable microfoam.
- Tap: Gently but firmly tap the bottom of the pitcher on your countertop a few times. This helps to burst any remaining large air bubbles on the surface.
- Swirl: Swirl the milk in the pitcher continuously with a vigorous but controlled motion. This integrates the foam with the liquid milk, creating a homogenous, silky texture that shines and flows like wet paint. Keep swirling until you’re ready to pour to prevent the milk from separating.
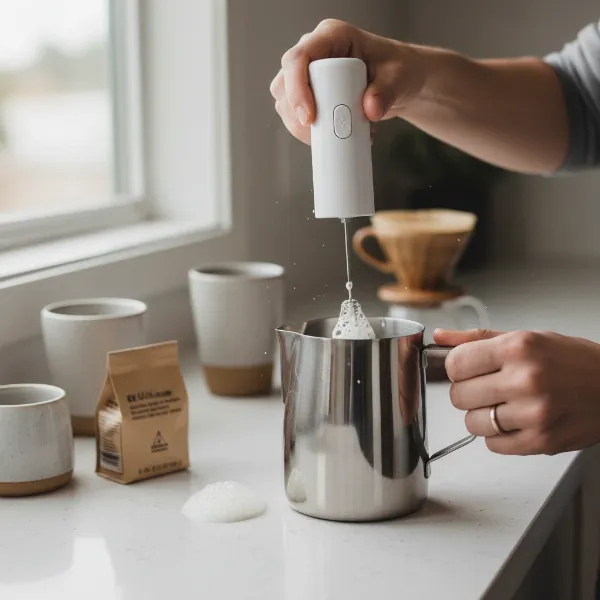 A person using a cheap handheld frother to create microfoam in a small metal pitcher, showing the whisk just beneath the milk surface with small bubbles forming, bright kitchen background.
Tips for Consistent Microfoam Excellence
Mastering microfoam with a handheld frother takes practice, but these tips will help you consistently achieve excellent results.
- Fresh and Cold is Key: Always use fresh milk straight from the refrigerator. The colder it is, the more time you have to aerate and texture before it overheats, leading to better foam quality.
- Cleanliness is Next to Frothiness: Rinse your frother’s whisk immediately after each use. Dried milk residue can clog the whisk and significantly impair its ability to create fine bubbles, leading to coarse, uneven foam.
- Practice Makes Perfect: Don’t get discouraged if your first few attempts aren’t perfect. Consistency comes with practice. Pay attention to the sounds, the feel of the pitcher, and the visual cues of the milk.
- Experiment with Milk Types: While whole milk is a great starting point, try different dairy and non-dairy options. Each behaves slightly differently, and you might find a particular type that you prefer or that froths exceptionally well with your specific frother.
- Listen to the Sound: In the aeration phase, listen for that soft “hiss.” If you hear a high-pitched scream, you’re introducing too much air too quickly. If you hear nothing, the frother might be too deep. Adjust the position until you get that gentle tearing sound.
“Achieving the perfect microfoam isn’t just about the tools; it’s about understanding the milk and being attentive to its transformation. Starting with cold, fresh milk and carefully controlling the aeration and incorporation phases are the secrets to success, even with a basic handheld frother.”
Common Mistakes and How to Troubleshoot Them
Even seasoned home baristas encounter issues. Here’s how to address common problems when frothing with a handheld device:
- Too Many Large Bubbles: If your milk has big, airy bubbles on top, you likely introduced too much air or kept the frother too high on the surface for too long.
- Fix: Reduce aeration time in the “stretching” phase. Lower the frother deeper earlier to incorporate and refine those bubbles. Remember to tap and swirl vigorously.
- No Foam or Watery Foam: This usually happens if the frother is submerged too deep throughout the process, or if the milk wasn’t cold enough to start, or if it was overheated.
- Fix: Ensure the whisk is just at the surface during the initial aeration phase. Use fresh, very cold milk. Monitor the temperature carefully to avoid overheating.
- Milk Separating Quickly (Foam on top, liquid below): This is a sign of unstable foam, often due to overheating the milk or insufficient incorporation.
- Fix: Keep the milk within the 140-155°F range. After frothing, swirl the milk continuously until you pour to maintain its homogenous texture.
- Frother Not Powerful Enough: If your frother struggles to create a vortex or fine bubbles despite proper technique, its batteries might be low or it might genuinely lack power.
- Fix: Replace batteries. If it’s a very cheap or old model, consider investing in a slightly more robust handheld frother, though many affordable options still perform well.
 A perfectly frothed pitcher of velvety microfoam milk, ready for pouring latte art into a coffee cup, showcasing the smooth, glossy texture.
Conclusion
Creating velvety microfoam with a cheap handheld frother is entirely within your reach. It’s a journey that combines understanding the science of milk, mastering a few key techniques, and embracing the power of practice. By starting with fresh, cold milk, carefully managing the aeration and incorporation phases, and paying close attention to temperature, you can consistently achieve the smooth, glossy texture that elevates any coffee drink. So grab your frother, a pitcher of cold milk, and start experimenting. The world of café-quality coffee at home awaits you, proving that an exceptional coffee experience doesn’t always demand an expensive machine. What’s your next favorite coffee creation going to be?
Frequently Asked Questions
Can I use non-dairy milk to make microfoam with a handheld frother?
Absolutely! Many non-dairy alternatives, particularly barista-blend oat milk, are excellent for creating microfoam. Soy milk also froths well. Almond milk tends to be lighter, while coconut milk can be rich but might impart a strong flavor. Experiment to find the non-dairy milk that best suits your taste and frothing preferences.
How do I know when my microfoam is ready for pouring?
You’ll know your microfoam is ready when it has a glossy, wet paint-like appearance and a smooth, uniform texture with no visible large bubbles. It should swirl easily in the pitcher and blend seamlessly into the liquid milk, indicating successful incorporation. The temperature should also be in the ideal range of 140-155°F (60-68°C).
What is the ideal temperature for frothing milk with a handheld frother?
The ideal temperature for frothing milk to achieve microfoam and preserve sweetness is between 140°F and 155°F (60°C to 68°C). Overheating milk beyond this range will cause it to lose its natural sweetness and can result in a burnt taste and unstable foam. Using a thermometer is highly recommended.
Why are my bubbles too big when using a handheld frother?
Large bubbles typically indicate that you introduced too much air too quickly or kept the frother too high in the milk during the aeration phase. To fix this, ensure the whisk is just barely breaking the surface for a shorter duration, and then lower it deeper into the milk to incorporate and refine those bubbles into a smoother microfoam. Tapping and swirling vigorously afterward will also help.