It’s a familiar story for any home barista. You’re ready to craft that perfect, cloud-like cappuccino, you reach for your trusty milk frother, and then it hits you—that tiny, essential whisk is gone. Before you resign yourself to a sad, flat coffee, take a deep breath. Knowing What To Do If The Whisk Is Lost can save your morning ritual and get you back to frothing in no time. This guide is your complete game plan, from immediate DIY hacks to finding a long-term solution.
What is a Milk Steamer Frother, Anyway?
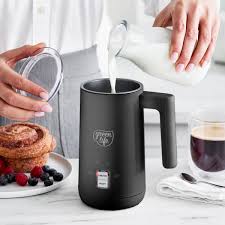
Let’s start with the basics. A Milk Steamer Frother is a kitchen gadget designed to do one thing exceptionally well: aerate milk. By rapidly spinning a whisk, it introduces tiny air bubbles into the milk, transforming its texture from a flat liquid into a creamy, velvety foam. This “microfoam” is the secret behind your favorite coffee shop drinks like lattes, cappuccinos, and macchiatos. It not only adds a luxurious mouthfeel but also enhances the flavor of your coffee.
The Different Types of Frothers on the Block
Not all frothers are created equal, and knowing which one you have is key to understanding your options. They generally fall into three main categories.
Handheld Frothers
These are the battery-powered wands. They’re simple, portable, and affordable. You just dip the whisk head into your milk and press a button. While effective for a quick froth, they don’t heat the milk, and the whisk is permanently attached, so losing it isn’t a concern.
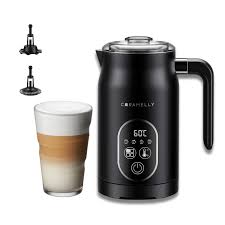
Automatic Electric Frothers
This is the most popular type for home use and, you guessed it, the one where the whisk often goes missing. These countertop devices look like a small kettle. They feature a detachable, magnetic whisk (or two) that sits inside. You pour in your milk, press a button, and it heats and froths simultaneously. It’s this small, powerful, and easily removable whisk that can vanish into thin air.
Steam Wands (Espresso Machine Attachments)
Found on semi-automatic and automatic espresso machines, these wands use high-pressure steam to both heat and texturize milk. This is the professional method, offering the most control over foam quality. There’s no separate whisk to lose here, but it does require a bit more skill to master.
What to Do If the Whisk is Lost: Your Action Plan
So, the magnetic whisk from your automatic frother has disappeared. It happens to the best of us. Maybe it fell into the sink drain or got accidentally tossed with coffee grounds. Don’t worry. Here’s a step-by-step guide to handle the situation.
Step 1: Immediate DIY Frothing Hacks
You need frothed milk now. Your coffee is waiting. Here are a few tried-and-true methods using common kitchen tools to get you by.
- The Mason Jar Shake: Pour your cold or warmed milk into a clean jar, filling it no more than halfway. Screw the lid on tight and shake it like you mean it for about 30-60 seconds. You’ll be surprised by the decent foam you can create!
- The French Press Plunge: If you have a French press, you’re in luck. Pour warmed milk into the carafe (again, about halfway). Place the lid on and rapidly pump the plunger up and down for about a minute. This method creates a surprisingly stable and fine-textured foam.
- The Whisk by Hand: It’s old-school but effective. Heat your milk in a small saucepan. Take it off the heat and use a small kitchen whisk, vigorously whipping the milk back and forth until it becomes foamy. It takes some elbow grease, but it works.
- The Immersion or Regular Blender: For a quick, powerful froth, a blender is a great option. Just be careful with hot liquids. Use short pulses to incorporate air until you reach your desired texture.
“Losing a part of your favorite appliance is frustrating, but it’s also a chance to get creative,” advises Leo Carter, a seasoned barista and appliance specialist. “Many of the manual frothing methods, like the French press technique, can produce foam that’s nearly as good as an automatic frother. It connects you more to the coffee-making process.”
Step 2: The Hunt for a Replacement Whisk
While DIY methods are great in a pinch, you’ll want your machine back in action. Finding a replacement is your next mission.
- Check the Manufacturer’s Website: This is your first and best stop. Brands like Nespresso, Breville, Miroco, and Bodum often sell replacement parts directly on their websites under a “Parts” or “Accessories” section.
- Search by Model Number: Your frother has a model number, usually on the bottom of the base. Use this number to search online marketplaces like Amazon or specialty appliance part websites. Be specific, e.g., “Nespresso Aeroccino 3 frothing whisk replacement.”
- Are Whisks Universal? Unfortunately, no. Most frother whisks are designed specifically for their corresponding model. They rely on a precise magnetic connection and size to create the perfect vortex for frothing. Using the wrong whisk may not work at all or could even damage your device.
Step 3: A Strategy for Never Losing It Again
Once you have your replacement, let’s make sure it’s the last one you ever have to buy.
- Create a Designated Home: Many frothers have a small storage spot on the lid or base for the spare whisk. Use it! If not, find a small, dedicated dish or magnetic clip next to your coffee station.
- Wash and Store Immediately: The most common time for a whisk to get lost is during cleaning. Make it a habit to rinse the whisk, dry it, and put it back in its designated spot right away. Never leave it loose in the sink or on the drying rack.
- Check Your Drain Catcher: Before you assume it’s gone forever, always check your sink’s drain catcher. These tiny parts are notorious for slipping down the drain.
Pro Tips for Perfect Foam
Whether you have your original whisk or are using a backup method, the quality of your foam comes down to a few key factors.
- Start with Cold, Fresh Milk: Cold milk froths best. The proteins in the milk are what create stable bubbles, and they structure better when cold.
- Fat Content Matters: Whole milk creates the richest, creamiest foam due to its higher fat content. Skim milk creates a larger volume of lighter, airier foam that dissipates more quickly. For dairy-free options, choose “barista blend” versions of oat, soy, or almond milk, as they contain additives to help them froth properly.
- Don’t Overfill: Never fill your frother or frothing container past the “max” line. The milk needs room to expand as it aerates.
Frequently Asked Questions (FAQ)
Q: Can I use a whisk from a different brand in my milk frother?
A: It is highly unlikely to work. Frother whisks are specifically designed for the size, shape, and magnetic strength of their own model. Using an incompatible whisk could result in poor frothing or might not spin at all.
Q: What is the difference between the two whisks that came with my frother?
A: Typically, one whisk has a wire coil around it—this is the frothing whisk. The other, simpler one is just a paddle for heating and lightly stirring milk without creating significant foam, perfect for a flat white or hot chocolate.
Q: How much does a replacement frother whisk usually cost?
A: The price can vary depending on the brand and model, but you can generally expect to pay between $5 and $15 for a genuine replacement part.
Q: I lost the frothing coil but still have the paddle part. Can I still make foam?
A: No, the coil is the essential component for creating thick foam. The paddle part is designed only for heating and stirring, and it will not produce the airy texture you’re looking for.
Q: Can I still use my frother base to heat liquids if the whisk is lost?
A: Absolutely! The base of an automatic frother is essentially a small induction heater. You can still use it to warm milk, water for tea, or make hot chocolate by simply stirring the powder in by hand.
Bring Back the Froth
Losing that tiny whisk doesn’t have to mean the end of your delicious, homemade lattes. From clever kitchen hacks to easily sourced replacements, there’s always a solution. Knowing what to do if the whisk is lost empowers you to handle the hiccup with confidence. So, take a moment to implement a prevention strategy, and get back to enjoying that perfectly crafted, foam-topped beverage that makes your day a little brighter.