Ever sip a café-made latte and wonder, “How do they get the milk so ridiculously perfect?” That creamy, velvety texture, that sweet warmth that hugs the espresso just right—it feels like a little bit of magic. Well, I’m here to pull back the curtain. The secret isn’t magic; it’s technique. And you’re probably asking, What Is The Best Way To Froth Milk right in your own kitchen? The good news is, you absolutely can, and it’s easier than you think. This guide is your new best friend on the journey to becoming a home-barista hero.
Whether you dream of pouring your first piece of latte art or just want to level up your morning cappuccino, we’re going to break it all down. We’ll explore the tools, the types of milk, and the little-known tricks that separate flat, bubbly milk from that glorious, silky microfoam you’ve been craving. Let’s get started.
What is a Milk Steamer Frother and Why Do You Need One?
At its core, a milk frother is a device designed to do one thing beautifully: aerate milk. By rapidly injecting air into the milk while heating it (in most cases), it transforms the milk’s proteins and fats. This process creates tiny, stable bubbles, resulting in a texture that’s thicker, richer, and sweeter to the taste. It’s the soul of drinks like cappuccinos, lattes, and macchiatos.
But why do you need one? Because frothed milk isn’t just about bubbles.
- Texture: It creates a luxurious, velvety mouthfeel that complements the boldness of coffee.
- Flavor: The aeration process actually makes the milk taste sweeter, reducing the need for added sugar.
- Experience: It elevates a simple cup of coffee into a special, café-style ritual you can enjoy every single day, right at home. It’s the difference between a good coffee and an unforgettable one.
The Three Main Types of Milk Frothers
Navigating the world of frothers can feel a bit overwhelming at first. But really, they fall into three main camps. Let’s break them down so you can find your perfect match.
1. Handheld Wand Frothers
These are the little guys that look like a mini-immersion blender. They’re battery-operated and incredibly simple. You just dip the whisk end into your milk (hot or cold) and press a button.
- Pros: Super affordable, compact, easy to clean, and portable.
- Cons: You have to heat the milk separately (usually in the microwave or on the stovetop). It can create a stiffer, more bubbly foam rather than true microfoam, and achieving a consistent texture takes practice.
- Best for: Beginners, those on a tight budget, or anyone who only needs frothed milk occasionally.
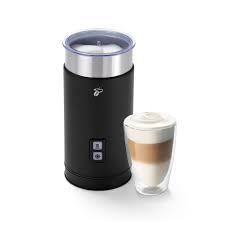
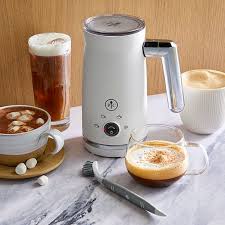
2. Automatic Electric Frothers
These countertop gadgets are a game-changer for convenience. They’re typically a standalone jug with a heating element and a magnetic frothing whisk inside. You pour in cold milk, press a button, and a few minutes later, you have perfectly heated and frothed milk. Many even have a cold froth setting for iced lattes.
- Pros: Incredibly easy to use, consistent results every time, heats and froths simultaneously.
- Cons: Can be bulkier than a handheld wand, and they represent a slightly higher investment.
- Best for: The daily coffee drinker who values convenience and consistency above all else. If you want a perfect latte every morning with zero guesswork, this is for you.
3. Espresso Machine Steam Wands
This is the traditional, barista-approved method. Found on semi-automatic and automatic espresso machines, the steam wand uses high-pressure steam to both heat and texture the milk simultaneously. This is the only method that can create true, paint-like microfoam, which is essential for latte art.
- Pros: The gold standard for texture and quality, offers complete control over temperature and aeration.
- Cons: Comes with a steep learning curve, requires a significant investment in an espresso machine, and is the most involved to clean.
- Best for: The serious coffee hobbyist, the aspiring home barista, and anyone who is passionate about creating high-quality latte art.
Here’s a quick comparison to help you decide:
| Feature | Handheld Wand | Automatic Frother | Steam Wand |
|---|---|---|---|
| Ease of Use | Easy (but requires practice) | Dead Simple | Difficult (steep learning curve) |
| Consistency | Low to Medium | High | High (with skill) |
| Foam Quality | Bubbly Foam | Good Froth/Foam | True Microfoam |
| Convenience | Medium (must heat milk) | Highest | Low (part of a larger process) |
| Cost | $ | $$ | $$$$ (part of a machine) |
| Cleaning | Very Easy | Easy | Involved |
|
Our Picks for the Best Milk Steamer in 2025
As an Amazon Associate, we earn from qualifying purchases.
|
||
| Num | Product | Action |
|---|---|---|
| 1 | SIMPLETASTE Milk Frother, 4-in-1 Electric Milk Steamer, Automatic Warm and Cold Foam Maker and Milk Warmer for Latte, Cappuccinos, Macchiato |

|
| 2 | SIMPLETASTE Milk Frother, 4-in-1 Electric Milk Steamer, Automatic Warm and Cold Foam Maker and Milk Warmer for Latte, Cappuccinos, Macchiato |
|
| 3 | Nespresso Aeroccino 3 Milk Frother, Black, Steel |
|
| 4 | Milk Frother and Steamer, Large Capacity Detachable Electric Milk Frother, Automatic Warm and Cold Foam Maker, Hot Chocolate Maker, BPA Free, Black |
|
| 5 | Dreo Milk Frother [Upgraded], All-in-1 Electric Foam Maker for Coffee, 15oz/450ml Automatic Foam Frother for Latte Art-level Microfoam, 30+ Drinks, Dishwasher Safe, Easy to Clean, LED display |
|
| 6 | Dreo Milk Frother [Upgraded], All-in-1 Electric Foam Maker for Coffee, 15oz/450ml Automatic Foam Frother for Latte Art-level Microfoam, 30+ Drinks, Dishwasher Safe, Easy to Clean, LED display |
|
| 7 | Milk Frother and Steamer, Large Capacity Detachable Electric Milk Frother, Automatic Warm and Cold Foam Maker, Stainless Steel Jug, BPA Free |
|
| 8 | Electric Milk Frother and Steamer, 16.9oz/500ml Milk Steamer and Frother for Latte, Dishwasher Safe, BPA Free, 4 Functions, Enjoy Perfect Milk Froth in 2 Min - White |
|
| 9 | Subminimal NanoFoamer Pro Gen-2 – Revolutionary Hands-Free Microfoam Milk Maker for Cafe-Quality Foam, Coffee Bar Accessories for Dairy & Plant-Based Milk, Perfect Coffee Gifts – US Plug Type |
|
| 10 | Instant Pot Milk Frother, 4-in-1 Electric Milk Steamer, 10oz/295ml Automatic Hot and Cold Foam Maker and Milk Warmer for Latte, Cappuccinos, Macchiato, From the Makers of Instant 500W, Black |
|
So, What Is The Best Way To Froth Milk? A Step-by-Step Guide
Regardless of the tool you choose, the fundamental principles of frothing milk remain the same. The goal is to introduce air (aeration) and then blend that air into the milk to create a smooth, swirling vortex (texturing).
Here’s a universal step-by-step process:
- Start with Cold, Fresh Milk. Seriously, this is non-negotiable. Cold milk froths infinitely better. The proteins are firmer and can create a more stable structure for the bubbles. Pour it into your frothing pitcher or jug. A stainless steel pitcher is ideal for use with a steam wand as it allows you to feel the temperature.
- Position Your Frother.
- For a Handheld Wand: Insert the tip just below the surface of the milk before turning it on.
- For an Automatic Frother: Just put the lid on! The machine does the work.
- For a Steam Wand: Submerge the tip just below the surface, slightly off-center. This position will help create that all-important vortex.
- Aerate the Milk (The “Stretching” Phase). This is where you introduce the air. With a steam wand, you’ll hear a gentle “tss-tss-tss” sound, like paper tearing. You’re looking for the volume of the milk to increase by about 20-30%. With a handheld frother, keep the tip near the surface to pull air in. This phase only lasts for the first few seconds.
- Incorporate and Heat (The “Texturing” Phase). Once you’ve added enough air, submerge the frother or steam wand deeper into the milk. Angle your pitcher to create a whirlpool or vortex. This motion breaks down any large bubbles and blends the air into the milk, creating a uniform, silky texture. For steam wands, continue heating until the pitcher is hot to the touch (around 140-150°F or 60-65°C).
- Groom the Milk. Once done, immediately tap the pitcher firmly on the counter a few times to pop any large, remaining bubbles. Give the pitcher a good swirl to polish the milk and give it a glossy, wet-paint-like sheen.
- Pour Immediately. That beautiful foam won’t last forever! Pour it into your espresso or hot chocolate right away to enjoy the perfect texture.
Pro Tips for Next-Level Froth
Ready to move from good to great? These professional tips will make all the difference.
What kind of milk is best for frothing?
The best milk for frothing is fresh, cold whole dairy milk. The high protein content creates a stable foam, and the fat content contributes to a rich, creamy flavor and texture. However, you can froth almost any milk!
- Skim Milk: Creates a large volume of stiff, dry foam due to its high protein-to-fat ratio, but it lacks the creamy flavor.
- Oat Milk (Barista Edition): The undisputed king of non-dairy milks for frothing. Brands like Oatly or Califia Farms Barista Blend are specifically formulated with added fats and emulsifiers to steam just like dairy milk.
- Soy Milk: Froths quite well, creating a decent foam, though the flavor can be distinct.
- Almond Milk: Can be tricky. It often creates large bubbles that dissipate quickly. Look for barista-specific versions for better results.
Expert Take: According to veteran barista Isabella Rossi, “The mistake most people make at home is using old milk or not starting cold enough. Milk is a fresh product. The proteins break down over time, making it harder to get a stable foam. Always use fresh, fridge-cold milk for the best possible results.”
Why is temperature so important?
Temperature is everything. If you under-heat the milk, it will taste flat. If you overheat it (past 160°F or 70°C), you “scald” it. This denatures the proteins, destroying the foam structure and giving the milk a burnt, unpleasant taste. The sweet spot is 140-150°F (60-65°C), where the sweetness and texture are at their peak.
How to Clean and Maintain Your Milk Frother
A clean frother is a happy frother. Milk residue can build up quickly, affecting performance and hygiene.
- Handheld Wands: Simply rinse the whisk end under hot running water immediately after use. You can also pulse it for a second in a cup of soapy water, then rinse.
- Automatic Frothers: Follow the manufacturer’s instructions. Most jugs and lids are dishwasher safe, but be sure to wipe the base clean and never submerge it in water.
- Steam Wands: This is critical. Wipe the wand with a dedicated damp cloth immediately after every single use. Then, “purge” the wand by turning the steam on for a second or two to clear any milk from inside the tip. If you let milk dry on the wand, it’s incredibly difficult to remove.
What to Consider When Choosing Your Frother
Still on the fence about which one to buy? Ask yourself these questions:
- What’s my budget? This is the easiest way to narrow it down. A handheld wand can be under $20, while an espresso machine is a multi-hundred or thousand-dollar investment.
- How much time and effort am I willing to spend? If you want a one-touch solution for your busy mornings, an automatic frother is your best bet. If you enjoy the process and want to master a skill, a steam wand is more rewarding.
- What drinks will I be making? If you just want to top a drip coffee with some foam, a handheld frother is perfect. If you’re serious about making lattes and cappuccinos, you’ll want an automatic frother or a steam wand.
- Am I interested in latte art? If the answer is yes, a steam wand is the only tool that will give you the microfoam quality you need. We have a great [introduction to latte art basics for beginners] if you’re curious!
Frequently Asked Questions
Q: Why isn’t my milk frothing properly?
A: The most common culprits are that your milk isn’t cold enough or it isn’t fresh. Using older milk or milk that has been sitting out can prevent a stable foam from forming. Also, ensure your frothing device is clean.
Q: Can I froth non-dairy milk?
A: Absolutely! The best option is a “barista blend” oat milk, as it’s formulated to perform like dairy milk. Soy milk also works well. Almond and coconut milks can be more challenging, but barista versions are available.
Q: What is the difference between frothed milk and steamed milk?
A: Often the terms are used interchangeably, but technically, “steamed milk” refers to milk heated with a steam wand that has very little air incorporated (like for a flat white), while “frothed milk” has been aerated to create a thicker layer of foam (like for a cappuccino).
Q: Can I make cold foam?
A: Yes! Many automatic frothers have a cold froth setting. You can also use a handheld frother with cold milk in a cup to create a delicious cold foam for topping iced coffees and cold brews.
Q: Do I need a special pitcher to froth milk?
A: For handheld and automatic frothers, the included vessel is fine. For a steam wand, a stainless steel frothing pitcher is highly recommended. It helps you control the vortex and, most importantly, allows you to gauge the temperature by touch.
Your Perfect Coffee Awaits
Ultimately, there isn’t one single answer to what is the best way to froth milk. The best way is the one that fits your lifestyle, your budget, and the drinks you love to make. For the ultimate convenience and consistency, an automatic frother is a clear winner. For the aspiring artist and coffee purist, mastering a steam wand is a deeply rewarding journey. And for a simple, budget-friendly start, the handheld wand is a fantastic entry point.
Whichever path you choose, you now have the knowledge to transform your daily coffee from a routine into a ritual. So go ahead, grab some fresh, cold milk, and start creating. That perfect, café-quality cup is now within your reach.