Waking up to the promise of a perfectly frothed latte, only to find your milk frother’s whisk isn’t working, can be a disheartening start to the day. As someone with over a decade of experience deep-diving into milk frother technology, I understand the frustration of a malfunctioning whisk. This guide will walk you through diagnosing, repairing, or replacing your milk frother’s whisk, ensuring you can get back to enjoying luscious, creamy foam with ease. We’ll cover everything from simple fixes to identifying when it’s time for a replacement, providing the practical knowledge you need to maintain your beloved coffee companion.
Understanding Your Milk Frother Whisk: Signs of Trouble
The whisk is the heart of your milk frother, responsible for aerating milk into that signature velvety microfoam. When it stops working correctly, the signs are usually clear. What exactly constitutes a “broken” whisk can range from a subtle decline in performance to a complete failure to froth.
Common symptoms you might encounter include a lack of froth, thin and watery foam, or an inconsistent texture that falls flat. Sometimes, your frother might begin making unusual rattling or grinding noises during operation. The most obvious sign, of course, is physical damage: a bent wire, a missing spring, or a whisk that has completely detached or broken. These issues often stem from general wear and tear, accidental drops, or improper cleaning that leads to residue buildup, hindering the whisk’s movement and effectiveness.
Diagnosing Your Milk Frother Whisk: A Step-by-Step Guide
Before attempting any repairs or replacements, a thorough diagnosis can save you time and effort. Pinpointing the exact problem will guide you to the most effective solution.
Visual Inspection: Spotting the Obvious
|
Our Picks for the Best Milk steamer in 2026
As an Amazon Associate I earn from qualifying purchases.
|
||
| Num | Product | Action |
|---|---|---|
| 1 | Large Electric Milk Frother and Steamer, 16.9oz/500ml Milk Steamer and Frother for Latte or Hot Chocolate, Dishwasher Safe, 6 Functions, Enjoy Perfect Milk Froth in 2 Min (White-Glass) |

|
| 2 | HAUSHOF Milk Frother, 4-in-1 Electric Milk Frother and Steamer, Large Capacity, Hot Chocolate Maker, Automatic Warm and Cold Foam Maker for Coffee, Latte, Macchiato, Cappuccino |
|
| 3 | SIMPLETASTE Milk Frother, 4-in-1 Electric Milk Frother and Steamer, Automatic Warm and Cold Foam Maker and Milk Warmer for Latte, Cappuccinos, Dark Blue |
|
| 4 | Milk Frother, 4-in-1 Milk Frother and Steamer, 10.6oz Electric Milk Steamer, Automatic Cold and Hot Foam maker for Lattes, Cappuccinos, Ceramic Lining Interior (Polished) |
|
| 5 | Milk Frother, 4-in-1 Electric Milk Steamer, 350ml/11.8oz Automatic Frother Machine for Coffee, Warm and Cold Foam, Temperature Control for Latte, Cappuccino, Hot Chocolate |
|
| 6 | SIMPLETASTE Milk Frother, 4-in-1 Electric Milk Steamer, Automatic Warm and Cold Foam Maker and Milk Warmer for Latte, Cappuccinos, Macchiato |
|
| 7 | SIMPLETASTE Milk Frother, 4-in-1 Electric Milk Steamer, Automatic Warm and Cold Foam Maker and Milk Warmer for Latte, Cappuccinos, Macchiato |
|
| 8 | Milk Frother, Paris Rhône 4-in-1 Milk Steamer and Frother, Hot & Cold Foam Milk Warmer with Temperature Control, Auto Shut-Off Frothers for Coffee, Latte, Cappuccino, Macchiato |
|
| 9 | Electric Milk Frother and Steamer, 16.9oz/500ml Milk Steamer and Frother for Latte, Dishwasher Safe, BPA Free, 4 Functions, Enjoy Perfect Milk Froth in 2 Min |
|
| 10 | Milk Frother and Steamer, Large Capacity & Detachable Electric Milk Frother, Automatic Warm and Cold Foam Maker, Hot Chocolate Maker, Stainless Steel Jug, 30.44Oz./900ML |
|
Begin by visually inspecting the whisk. Is it bent, warped, or cracked? For many automatic frothers, the whisk is a small, detachable ring or coil at the bottom of the jug. Check if it’s securely seated or if any parts appear missing. For handheld frothers, examine the entire whisk head. Look for accumulated milk residue or foreign objects that might be jamming its movement. A surprisingly common issue is a whisk that’s simply caked with dried milk, preventing proper rotation or aeration.
Listen Closely: Decoding Unusual Sounds
Turn on your frother (without milk, if it’s an automatic model, or just the whisk for handheld) and listen. Does it sound different than usual? Rattling or grinding noises often indicate a loose whisk or an obstruction. A weaker-than-normal hum might suggest a problem with the motor itself, which in turn affects the whisk’s ability to spin effectively. If the whisk isn’t spinning at all, or spins very slowly, listen for any internal motor sounds.
Test with Water: Simulating Frothing Conditions
If the whisk appears intact but your milk isn’t frothing, try a simple test with cold water. Fill your frother to the minimum line with water and run it. Observe the whisk’s motion. Does it spin vigorously? Does it create a swirling vortex? If it struggles to move water or creates only weak agitation, the problem likely lies with the whisk’s effectiveness or the power driving it.
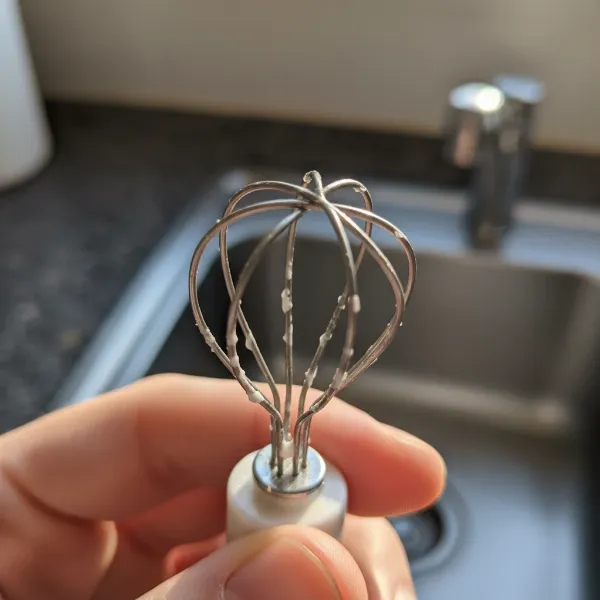 Close-up of a milk frother whisk being visually inspected for bends and residue.
Solutions for a Broken Milk Frother Whisk
Once you’ve diagnosed the issue, you can move on to finding the right fix. Depending on the type and severity of the damage, you might be able to repair it, or a replacement might be necessary.
Option 1: Repairing a Bent or Loose Whisk
For minor issues, especially with handheld frothers where the whisk is often a simple wire coil, a repair might be all you need.
- For Bent Wires: If your handheld frother’s whisk wires are slightly bent, you can often gently straighten them using small needle-nose pliers or even your fingers. Exercise extreme caution to avoid further damage or snapping the wires. The goal is to restore the original shape, allowing for even rotation. This method is generally not advisable for internal whisks of automatic frothers, as they are often more fragile or integrated.
- For Loose Whisk or Spring: In some automatic frothers, the whisk component, or a small spring that helps secure it, can become loose or dislodged. If your frother’s whisk is detachable, carefully remove it and ensure any securing spring is correctly aligned and seated at its base. Re-insert the whisk firmly, ensuring it clicks into place if designed to do so. A common scenario is a small spring that wraps around the stirring rod; ensure it’s properly re-seated.
Repair is possible when the whisk is physically present, not severely damaged, and primarily suffering from misalignment or slight bending. If the whisk is cracked, broken into pieces, or permanently deformed, repair is generally not a viable long-term solution.
Option 2: Replacing a Damaged Milk Frother Whisk
For many electric milk frothers, especially integrated automatic models, the most straightforward and often only solution for a physically broken or irreparably bent whisk is replacement.
- When Replacement is Necessary: If your whisk is severely bent, has missing pieces, or has completely detached from its drive mechanism and cannot be re-secured, a replacement is essential. This is also the case if the whisk itself is worn down, leading to ineffective frothing despite proper motor function.
- How to Find the Right Replacement: Your first stop should be the manufacturer’s official website or customer service. Many brands offer replacement parts specific to their models. Be sure to have your frother’s model number handy. You can also check major online marketplaces like Amazon or eBay. Sometimes, third-party sellers offer compatible whisks. Always verify compatibility with your specific frother model to ensure a proper fit and optimal performance. Some models, like Salter’s Aspen Milk Frother, have readily available replacement whisks, making this process quite simple.
- General Replacement Instructions: Always start by unplugging your electric frother for safety. Carefully remove the old, damaged whisk. For most automatic frothers, this involves simply lifting it out. Then, gently insert the new whisk, ensuring it sits securely at the base of the frother’s jug. Always refer to your frother’s user manual for brand-specific instructions, as designs can vary.
Option 3: Deep Cleaning for Clogged Whisks
Sometimes, a whisk that appears “broken” is simply clogged. Dried milk residue, especially around the whisk and its shaft, can prevent it from spinning freely or effectively aerating the milk.
- The Role of Residue Buildup: Milk proteins can be stubborn. If not cleaned immediately after each use, they can harden into a film that impedes the whisk’s motion, leading to poor frothing performance. This is particularly common in automatic frothers where the whisk is in constant contact with milk.
- Cleaning Steps:
- Immediate Rinse: After each use, rinse the whisk and frother jug with warm water.
- Soaking: For stubborn residue, detach the whisk (if possible) and soak it in warm, soapy water for 10-15 minutes. This helps loosen dried milk.
- Scrubbing: Use a soft brush (a small bottle brush or even an old toothbrush works well) to gently scrub away any remaining residue from the whisk and its base. For frothers with non-detachable whisks, fill the jug with warm soapy water and run it for a short cycle, then scrub carefully.
- Vinegar Solution: For significant mineral buildup or persistent milk film, a solution of equal parts warm water and white vinegar can be highly effective. Run a cycle with this solution, then rinse thoroughly. Always ensure all cleaning agents are completely rinsed before frothing milk again.
Beyond the Whisk: Other Frother Issues to Check
While a broken whisk is a common culprit, sometimes the problem lies deeper. If replacing or cleaning the whisk doesn’t resolve your frothing issues, consider these other possibilities:
- Motor Problems: If the whisk doesn’t spin at all or spins very weakly, even after cleaning and securing, the motor might be failing. This often requires professional repair or replacement of the entire frother, as motor components are rarely user-serviceable.
- Power Supply Issues: For battery-operated frothers, check if the batteries are dead or if there’s corrosion in the compartment. For electric plug-in models, ensure the power cord is securely plugged in and test the frother in a different outlet to rule out a faulty power source.
- Overheating: Some frothers have an automatic shut-off feature to prevent overheating from prolonged use. If your frother stops mid-cycle or blinks a red light, it might simply need to cool down. Allow it to rest for 5-10 minutes between uses to prevent motor strain.
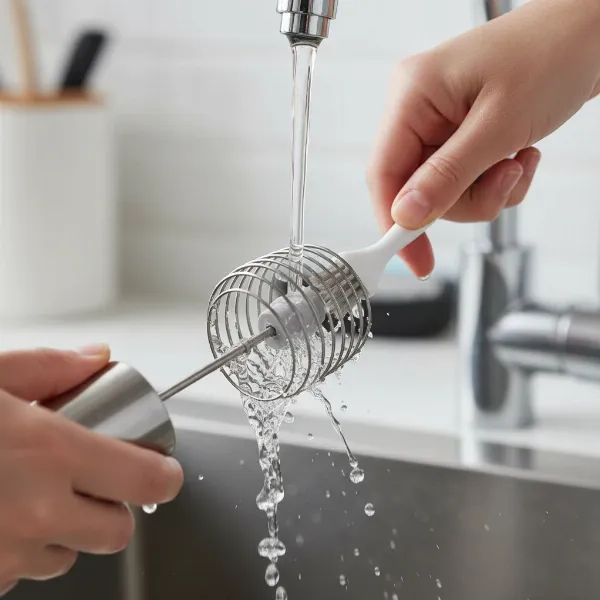 Hand cleaning a detachable milk frother whisk with a small brush under running water, emphasizing proper maintenance.
Extending Your Milk Frother Whisk’s Lifespan: Best Practices
Prevention is always better than cure. By adopting a few simple habits, you can significantly extend the life of your milk frother whisk and ensure consistent performance.
- Regular, Gentle Cleaning: The most crucial tip. Rinse the whisk immediately after each use to prevent milk residue from hardening. A thorough clean, as described above, should be part of your routine.
- Using Appropriate Milk Types and Fill Levels: Not all milk froths equally. Whole milk and barista-blend plant-based milks tend to produce the best foam. Always adhere to your frother’s minimum and maximum fill lines. Overfilling can lead to spills and residue buildup in hard-to-reach places, while too little milk might not activate the whisk properly.
- Proper Storage: Store your milk frother in a dry, safe place where it won’t be easily knocked over or have heavy objects placed on top of it. For detachable whisks, keep them in a designated spot to prevent loss or accidental bending.
- Avoiding Continuous, Prolonged Use: Give your frother a break between uses, especially if you’re making multiple drinks. This prevents the motor from overheating, which can stress its components, including the whisk’s drive mechanism.
“To achieve the perfect milk foam, consistent maintenance of your whisk is paramount. A clean, undamaged whisk is the unsung hero behind every creamy latte.” – [Your Name/Role as Admin of milksteamerfrother.com], Milk Frother Technician
Conclusion
A broken whisk on your milk frother doesn’t have to spell the end of your creamy coffee dreams. By carefully diagnosing the issue, whether it’s a simple clog, a bent wire, or a need for a full replacement, you can often restore your frother to its former glory. Remember the power of regular cleaning and mindful use in preventing future issues, ensuring your whisk remains in top condition for years to come. With these practical tips, you’re well-equipped to tackle any whisk woes and continue enjoying perfectly frothed milk. What’s your go-to method for keeping your milk frother’s whisk in pristine condition?
Frequently Asked Questions
Which type of milk frother whisk is best for beginners?
For beginners, a simple handheld milk frother with an easily replaceable or cleanable whisk is often ideal. Automatic frothers also offer convenience with integrated whisks, but handheld models allow for more hands-on practice in understanding how the whisk interacts with milk.
Can I use a universal whisk for my milk frother?
While some generic whisks are available, it’s generally best to use a whisk specifically designed for your milk frother model or from the original manufacturer. Universal whisks may not fit correctly, affecting frothing performance or potentially damaging your appliance.
How often should I clean my frother whisk?
You should rinse your frother whisk immediately after every use to prevent milk residue buildup. A deeper clean with soap and water, or a vinegar solution, is recommended weekly, or more frequently if you use your frother daily.
Why is my frother making strange noises?
Strange noises like rattling, grinding, or a weak hum often indicate a loose or obstructed whisk, or a motor issue. Check if the whisk is properly seated, inspect for any trapped debris, and ensure it’s clean. If the problem persists, the motor might be a concern.